Use same instructions for both 5"7' and 6"4' Tub variants

Tools Required:
• 1/2” impact gun • 1/4” impact gun • 18mm 1/2 Socket • 15mm 1/2 Socket • 300mm 1/2 extension • T25 Torx • T27 Torx • Wire Cutters • Medium flat head screwdriver • 4 x lifting slings • Forklift with Tyne extensions

Open fuel door, and remove cap
GOOD NEWS: Unlike almost all other Tub Removals, it is not necessary to remove the wheel arch plastics - they will stay in place
Use T25 to disconnect fuel neck from Tub. It will then be free
Open tail gate
Use T25, to remove 2 x Tail light housing screws
Pull directly back and tail light will pop out of its clips
On the LARAMIE model, the wiring is slightly different.
Wiggle plug so it comes away from tail light

Alternative wiring on EXPRESS model, has 2 plugs per light

Tailgate liner to be removed (if it has one) Use T25
Use T25 to remove tailgate cover
Use Flat head screwdriver to pry up corner. Remove cover panel
Unplug tailgate harness plug
Trim clips and pull harness out of tailgate
Use flat head screwdriver to pop clip out of tub, unplug.
Unplug other plug, this is to lock the tailgate
M8 with extension
Unplug camera, remove from tailgate
Remove handle assembly from tailgate.
T20 Torx Remove camera from tailgate handle assembly

Unplug wiring
Unplug license plate light plugs.........Pull the red clip OUT (to unlock it) then squeeze plug To disconnect. There is one on either side of license plate
Unplug reversing sensors plug (Located passenger side)
Use flat head screwdriver to Remove lic plate to (Also Necessary to access rear bumper bolts)

Remove this plate, unplug it

Some model also have this cover plate, need to remove it m4 hex head
15mm socket, remove 2 x bolts (was behind license plate)
15mm socket (no extension) for bumper bolts. 2 x bolts on each side

2 bolts showing here
Remove rear step. (It is light, 1 person lift)
Remove wings 15mm one each side
Front Mount: 18mm and long extension. Lay on workshop trolley To access under side of vehicle
Middle Mount: 18mm and long extension
IMPORTANT
Rear mounts……. Access to rear mounts will depend on IF and WHICH Towbar is fitted. If you are lucky, you will have a Towbar as shown in below step. If you don’t, it is necessary to remove the Towbar!
Rear Mount: 18mm and long extension
Shown accessible through Laramie towbar.
This is good because it has access from below
There are 2 ways to access the rear mounts
OPTION 1: Very difficult 18mm 3/8 drive Tight! NOT RECOMMENDED

OPTION 2: Remove Towbar bolts, All but top
Wiggle it
Mallet lower

Towbar off
18mm rear bolts
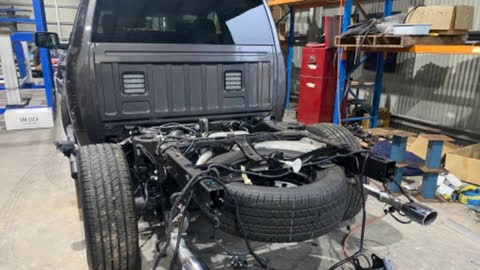
Cut zip ties holding harness to bottom of tub
Remove electrical unit, located pass side. 8mm socket ( 3 x bolts)
The top bolt is difficult to reach
Remove unit
Attach 4 x lifting slings to the hook points inside tub

Lift
Lift tub off. 2 ppl required. 1 x forklift driver, 1 x giving instructions and guiding tub away from vehicle.
NOTE: take particular care, so that the fuel filler comes away from the tub when lifting. This is the most important thing to watch

Keep all fasteners, and put them into a container and leave them in the tub

Off
Refit Towbar
Done