How to Set Up and Use the DJI Osmo Mobile 6
Follow these steps to set up and operate your DJI Osmo Mobile 6 for capturing smooth footage with ease.
Follow these steps to set up and operate your DJI Osmo Mobile 6 for capturing smooth footage with ease.
1
Step 1 of 17Unbox and Assemble
- Unbox: Inside, you’ll find the Osmo Mobile 6 gimbal and its accessories.
- Mount Tripod: Take out the Osmo Mobile 6 and attach the grip tripod to the base.
- Unfold the Gimbal for use.
2
Step 2 of 17Attach Your Phone
- Attach Phone Clamp: Place the Magnetic Phone Clamp at the center of your phone.
- Mount Phone to Gimbal: Attach the clamp to the magnetic dot on the gimbal.
3
Step 3 of 17Power On and Stabilize
- Turn On: Press and hold the M button for two seconds to power on and stabilize the gimbal.
4
Step 4 of 17Connect to DJI Mimo
- Enable Bluetooth and Internet on your phone.
- Launch the DJI Mimo app, select Osmo Mobile 6, and tap Authorize to connect via Bluetooth.
- The system status indicator will turn solid green, indicating a successful connection.
5
Step 5 of 17Start Recording
- Switch Modes: Slide between Photo and Video mode in the Mimo app’s camera view.
- Record Footage: Tap the record button to capture video or photo, and tap the playback icon to review footage.
6
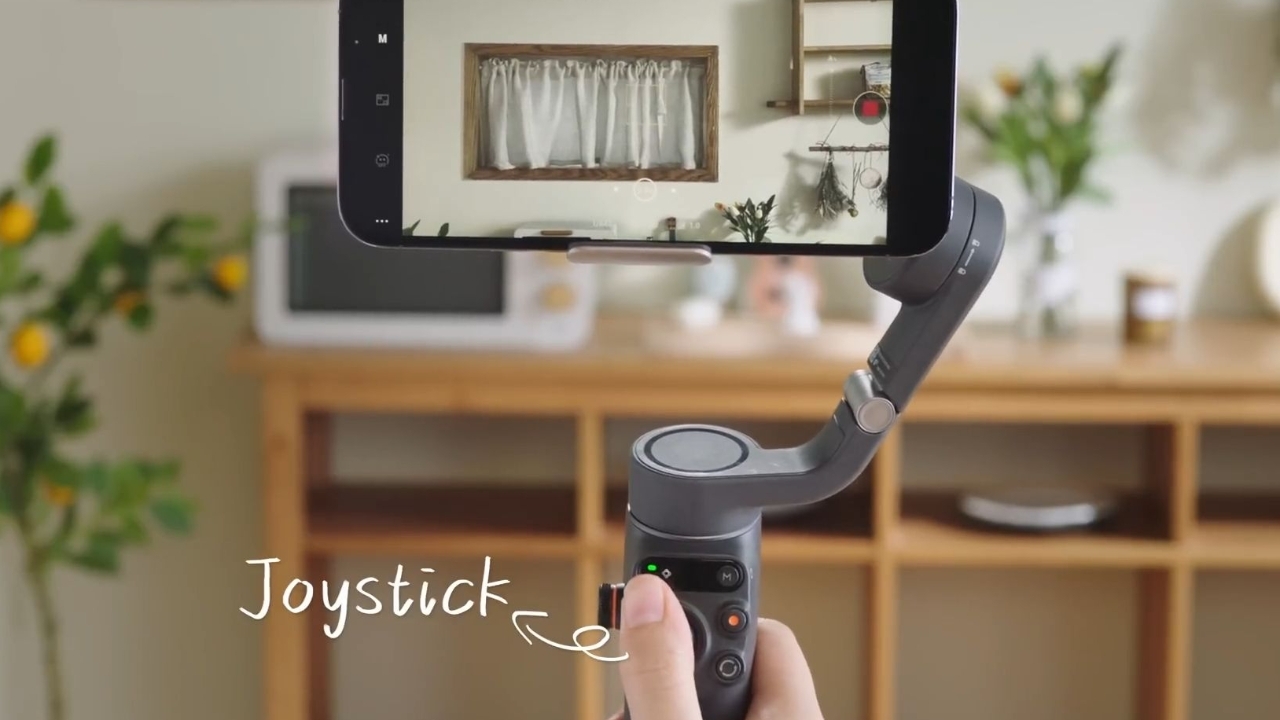
Step 6 of 17Advanced Controls
Control Gimbal Direction
- Use the joystick on the gimbal to adjust the direction your phone is pointing.
7
Step 7 of 17Switch Gimbal Follow Modes
- Press the M button once to switch between different gimbal follow modes.
8
Step 8 of 17Enter Standby Mode
- Press the M button three times to put the gimbal into standby mode.
- In standby, the system status indicator will blink yellow or green slowly.
9
Step 9 of 17Start and Stop Recording
- Press the shutter button once to start or stop video recording.
- In Photo mode, press and hold to take a series of shots.
10
Step 10 of 17Switch Cameras
- Press the switch button once to toggle between the front and rear cameras.
- Press the switch button twice to change between portrait and landscape orientation.
- Press three times to switch between Photo and Video modes.
11
Step 11 of 17Adjust Zoom
- Push the zoom slider to zoom in or out continuously.
- Push the zoom slider once for a quick zoom adjustment.
12
Step 12 of 17Enable ActiveTrack
- Press the trigger button once to activate or deactivate ActiveTrack, which keeps a subject in the frame.
13
Step 13 of 17Recenter the Gimbal
- Double-press the trigger to recenter the gimbal back to its default position.
14
Step 14 of 17Lock Gimbal Position
- Press and hold the trigger to lock the gimbal, keeping it pointed in the same direction regardless of movement.
15
Step 15 of 17Set Follow Speed
- Press the trigger once, then hold to adjust the follow speed of the gimbal, allowing for smoother tracking or faster panning.
16
Step 16 of 17Battery Status: Indicators show battery level (solid red, yellow, or green).
17
Step 17 of 17Power Off and Store
- Power Off: Press and hold the M button to turn off the gimbal.
- Detach and Fold: Remove your phone and the magnetic clamp, adjust the gimbal angle, and fold it for storage.