Knowby Metalform
Knowby
Upload Software Micro controler
Microcontroler, Electrical Boxes, INCAB, LOADCELL, TOCO-E
1
Step 1 of 15
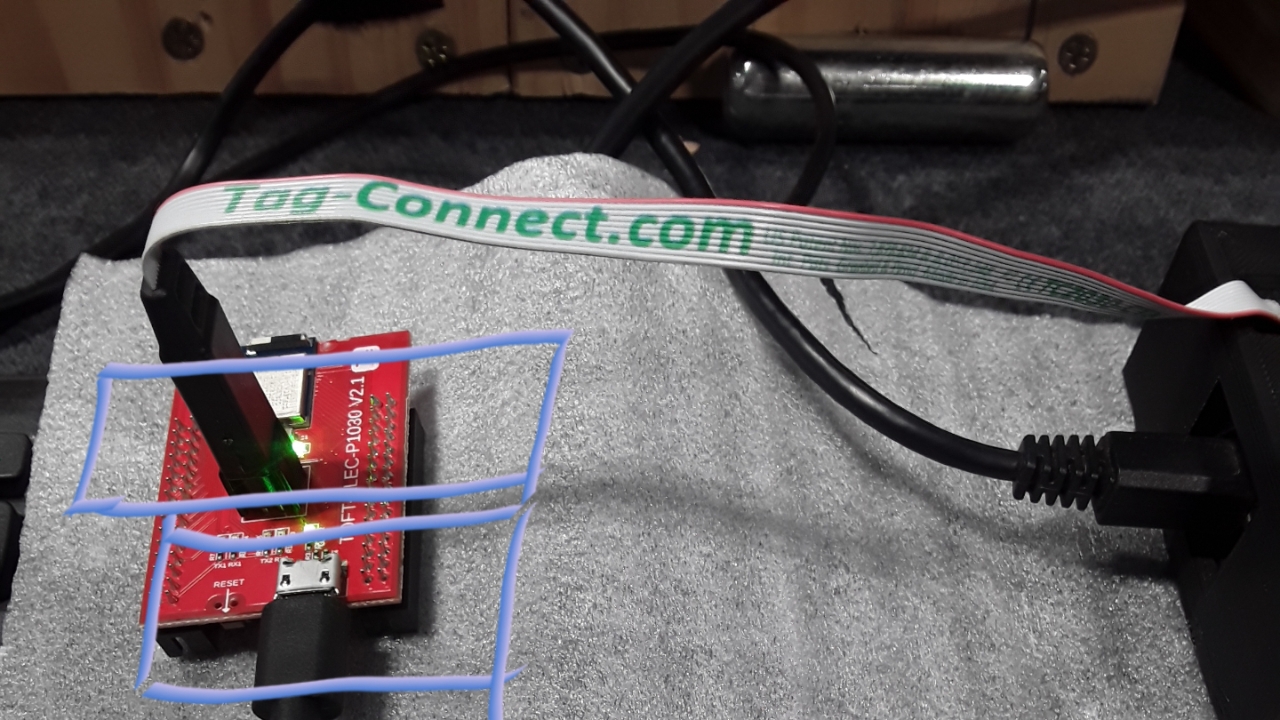
<p>Connect J-TAG to the T&amp;F microcontroller. <strong>(IMPORTANT!!)</strong> The J-TAG is designed to fit in only one orientation,  <strong>squeeze the clips together</strong> to secure the connection.</p>
<p>Connect the Micro USB cable.</p>

Connect J-TAG to the T&F microcontroller. (IMPORTANT!!) The J-TAG is designed to fit in only one orientation, squeeze the clips together to secure the connection.

Connect the Micro USB cable.

2
Step 2 of 15
<p>Open File Explorer and double-click on the &quot;Repositories&quot; folder.</p>

Open File Explorer and double-click on the "Repositories" folder.

3
Step 3 of 15
<p>Next, select the FW-Flash Tool folder and double-click to open it.</p>

Next, select the FW-Flash Tool folder and double-click to open it.

4
Step 4 of 15
<p>Double-click on the Script  folder.</p>

Double-click on the Script folder.

5
Step 5 of 15
<p>Next, hold down the Shift key and right-click (<strong>in open space on the folder window</strong>). New window will appear, Select &quot;Open Git Bash Here.&quot;</p>

Next, hold down the Shift key and right-click (in open space on the folder window). New window will appear, Select "Open Git Bash Here."

6
Step 6 of 15
<p>This will open a terminal window. Type  &quot;. upload_firmware.bash&quot; and press Enter.</p>

This will open a terminal window. Type ". upload_firmware.bash" and press Enter.

7
Step 7 of 15
<p>A new window will pop up, dispalying various flashing options. Select the one you need for either Tow and Fert or TOCO-E.</p>

A new window will pop up, dispalying various flashing options. Select the one you need for either Tow and Fert or TOCO-E.

8
Step 8 of 15
<p>For example, to flash the microcontroller for a Load Cell Monitor, select the option</p>
<p>TF-LOADCELLMONITOR and click OK.</p>

For example, to flash the microcontroller for a Load Cell Monitor, select the option

TF-LOADCELLMONITOR and click OK.

9
Step 9 of 15
<p>As shown in the photo, you can choose from different Flashing options.</p>
<ul>
<li><strong>(first time full install)</strong> &quot;Flash Bootloader &amp; Flash Firmware&quot; to upload both at once.</li>
<li><strong>(first time install, for one at a time)</strong> &quot;Flash Bootloader&quot; to upload the mcu boot manager (only necessary on first install).</li>
<li><strong>(updates)</strong> &quot;Flash Firmware&quot; to upload the product software.</li>
<li><strong>(download latest updates to PC)</strong> &quot;Update Repositories&quot; to download the latest firmware versions.</li>
</ul>

As shown in the photo, you can choose from different Flashing options.

  • (first time full install) "Flash Bootloader & Flash Firmware" to upload both at once.
  • (first time install, for one at a time) "Flash Bootloader" to upload the mcu boot manager (only necessary on first install).
  • (updates) "Flash Firmware" to upload the product software.
  • (download latest updates to PC) "Update Repositories" to download the latest firmware versions.
10
Step 10 of 15
<p><strong>For example</strong>, To flash a new T&amp;F microcontroller, select</p>
<ul>
<li>“Flash Bootloader &amp; Firmware” option if is the first time that the MCU is being flashed. And  Click OK</li>
<li>&quot;Flash Firmware&quot; option if just updating the software. And  Click OK</li>
</ul>

For example, To flash a new T&F microcontroller, select

  • “Flash Bootloader & Firmware” option if is the first time that the MCU is being flashed. And Click OK
  • "Flash Firmware" option if just updating the software. And Click OK
11
Step 11 of 15
<p>The system will automatically display different processes. If you see a window like the one shown in the photo, it indicates that the flashing process is proceeding successfully.</p>

The system will automatically display different processes. If you see a window like the one shown in the photo, it indicates that the flashing process is proceeding successfully.

12
Step 12 of 15
<p>Continue to monitor the process!</p>

Continue to monitor the process!

13
Step 13 of 15
<p>A new window will appear asking you to select a TAG. Please click on the latest version, which is typically listed from lowest to highest number. The highest number indicates the most recent version.</p>

A new window will appear asking you to select a TAG. Please click on the latest version, which is typically listed from lowest to highest number. The highest number indicates the most recent version.

14
Step 14 of 15
<p>The firmware flashing process will then begin.You will see an window indicating the uploading as a show in the photo.</p>

The firmware flashing process will then begin.You will see an window indicating the uploading as a show in the photo.

15
Step 15 of 15
<p>When it says &quot;t (main)&quot; It's all done, This T&amp;F micorcontroller is ready for service.  Disconnect the cables.</p>

When it says "t (main)" It's all done, This T&F micorcontroller is ready for service. Disconnect the cables.