Knowby
FUEL FILLER, EC RANGER
1
Step 1 of 28
2
Step 2 of 28

Contents (Click to view)

​STEP 3: Components List​

​STEP 6: Tools List​

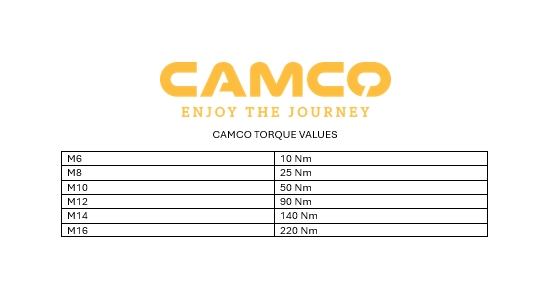
​STEP 7: Torque Values​

​STEP 8: Fuel Filler Preparation​

​STEP 11: Fuel Breather​

​STEP 20: Fuel Filler​

​STEP 28: QA Sheet​

3
Step 3 of 28
<p>Components List</p>

Components List

4
Step 4 of 28
<p>Components List</p>

Components List

5
Step 5 of 28
<p>Components List</p><p></p>

Components List

6
Step 6 of 28
<p>Tool List</p>

Tool List

7
Step 7 of 28
8
Step 8 of 28
<p>If there is a sock on the fuel filler, ensure this is removed.</p>

If there is a sock on the fuel filler, ensure this is removed.

9
Step 9 of 28
<p>Begin by carefully removing the factory-welded points on the fuel filler.</p>

Begin by carefully removing the factory-welded points on the fuel filler.

10
Step 10 of 28
<p>Ensure the fuel filler funnel is clean and tidy as shown.</p>

Ensure the fuel filler funnel is clean and tidy as shown.

11
Step 11 of 28
<p>Cut the fuel breathers before the tag.</p>

Cut the fuel breathers before the tag.

12
Step 12 of 28
<p>Place the fuel breather into the 8mm fuel hose (RS107605)</p>

Place the fuel breather into the 8mm fuel hose (RS107605)

13
Step 13 of 28
<p>Urethane the breather to the hose.</p>

Urethane the breather to the hose.

14
Step 14 of 28
15
Step 15 of 28
<p>Place the larger breather into the 16mm fuel hose (RS107602) and urethane.</p>

Place the larger breather into the 16mm fuel hose (RS107602) and urethane.

16
Step 16 of 28

Insert the breather to the front of the box as shown.

17
Step 17 of 28

Secure the breather to the box as shown.

18
Step 18 of 28

Insert the smaller breather beside the large breather and ziptie it to the larger breather.

19
Step 19 of 28
20
Step 20 of 28
<p>Cut the fuel filler hose so that the hose is facing all the way down with no angle.</p>

Cut the fuel filler hose so that the hose is facing all the way down with no angle.

21
Step 21 of 28

Insert 150mm x 1.55mm to the hose.

22
Step 22 of 28

Fit the angled hose supplied to the steel tube.

23
Step 23 of 28

Insert the fuel funnel into the hose too see how much angled hose needs cutting to fit the fuel funnel to the bracket on the box.

24
Step 24 of 28
<p>Cut the hose once the length is tested to the tight length.</p>

Cut the hose once the length is tested to the tight length.

25
Step 25 of 28
<p>Tighten the hose to the steel tube with hose clamps and do the same to the funnel.</p>

Tighten the hose to the steel tube with hose clamps and do the same to the funnel.

26
Step 26 of 28

Fit the fuel filler to the bracket and tighten it.

27
Step 27 of 28
<p>Finished.</p>

Finished.

28
Step 28 of 28
<p>Please fill out the hard copy QA sheet included with the product you got.</p><p>Once filled out, please send it back to</p><p><a target="_blank" rel="noopener noreferrer nofollow" href="mailto:charl@camcoindustries.co.nz">charl@camcoindustries.co.nz</a></p><p>&nbsp;</p><p>If the hard copy does not arrive, please contact us.</p><p><a target="_blank" rel="noopener noreferrer nofollow" href="mailto:charl@camcoindustries.co.nz">charl@camcoindustries.co.nz</a></p><p>0800 663 500</p>

Please fill out the hard copy QA sheet included with the product you got.

Once filled out, please send it back to

charl@camcoindustries.co.nz


If the hard copy does not arrive, please contact us.

charl@camcoindustries.co.nz

0800 663 500