
Knowby
Fitting a 36L Headboard Water Tank to Tray
On most vehicles (except LandCruiser) the water filler will be on the Drivers side. The LandCruiser is the opposite. For Cruiser, just flip the tank around 👍
1
Step 1 of 14

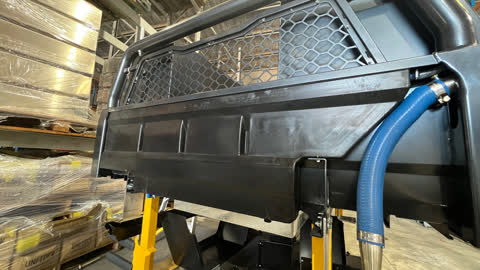
Will look like this when fitted

2
Step 2 of 14
<p>Remove the ”Headboard cover panels” If they are pre-fitted. 10mm</p>

Remove the ”Headboard cover panels” If they are pre-fitted. 10mm

3
Step 3 of 14
<p>Get the supplied water tank kit</p>

Get the supplied water tank kit

4
Step 4 of 14
<p>Water tank will fit up in the headboard like this. Loosely fit the tank to the tray, everything will be tightened at the end</p>

Water tank will fit up in the headboard like this. Loosely fit the tank to the tray, everything will be tightened at the end

5
Step 5 of 14

The driver side is supported by this small bracket

Tighten this AFTER water filler has been added. If you tighten it before, everything is tricky

6
Step 6 of 14

The passenger side is supported by this taller bracket.

It reuses the mounting fasteners for the front tray mount

Tighten this AFTER water filler has been added. If you tighten it before, everything is tricky

7
Step 7 of 14
<p>The reused mount</p>

The reused mount

8
Step 8 of 14
<p>Important!
Boil the jug. You will need it!</p>

Important! Boil the jug. You will need it!

9
Step 9 of 14
<p>The water tank will be prefitted with a rubber “Wallace Seal”</p>

The water tank will be prefitted with a rubber “Wallace Seal”

10
Step 10 of 14
<p>Remove the Wallace seal from tank. Just pull it out</p>

Remove the Wallace seal from tank. Just pull it out

11
Step 11 of 14
<p>Soften the Wallace Seal by leaving it in boiling water for a few mins</p>

Soften the Wallace Seal by leaving it in boiling water for a few mins

12
Step 12 of 14

Refit the Wallace seal to the tank

13
Step 13 of 14

Install the stainless filler. Don’t forget the backing plate (which needs to slide on before the stainless pipe slides into the wallace seal

14
Step 14 of 14

Fit the water outlet kit in a suitable position