Knowby
SHELVING, TRANSIT VERSI SHELVING
1
Step 1 of 33
2
Step 2 of 33

Contents (Click to view)

STEP 3: Components List

STEP 8: Tools List

STEP 9: Fit the top and side brackets

STEP 12: Fit Shelves/Sides to Floor

STEP 18: Fit Bars to Roof

STEP 33: QA Sheet

3
Step 3 of 33
<p></p>

4
Step 4 of 33
<p></p>

5
Step 5 of 33
<p></p>

6
Step 6 of 33
<p></p>

7
Step 7 of 33
8
Step 8 of 33
<p>Tools List</p>

Tools List

9
Step 9 of 33
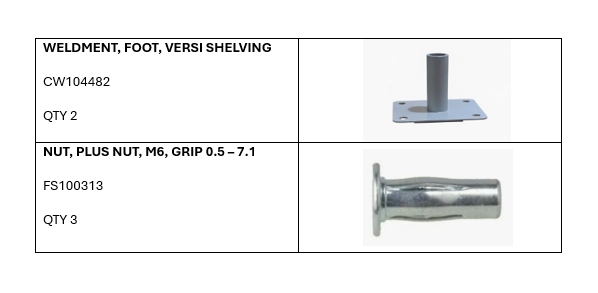
<p>Fit the brackets to the side of the van using plus nut screws&nbsp;</p>

Fit the brackets to the side of the van using plus nut screws 

10
Step 10 of 33
<p>Bolt the bracket to the versi framing. Ensure that the excess of the bracket is cut of where the red line is shown.</p>

Bolt the bracket to the versi framing. Ensure that the excess of the bracket is cut of where the red line is shown.

11
Step 11 of 33
<p>Fit the Versi frame together using M8 x 40mm hex head bolt with a M8 penny washer, and then use a M8 nyloc nut to tighten.</p>

Fit the Versi frame together using M8 x 40mm hex head bolt with a M8 penny washer, and then use a M8 nyloc nut to tighten.

12
Step 12 of 33
<p>Fit the bracket shown to the shelf to fit to the framing.</p>

Fit the bracket shown to the shelf to fit to the framing.

13
Step 13 of 33
14
Step 14 of 33
<p>Once the first shelf is installed on both slotted bars. Ensure that both bars are level.</p>

Once the first shelf is installed on both slotted bars. Ensure that both bars are level.

15
Step 15 of 33
<p>Use tek screws to hold the slotted bars securely to the ground of the van. Ensure the tek screw that is used is the Self-Tapping screw that requires a pilot hole.</p>

Use tek screws to hold the slotted bars securely to the ground of the van. Ensure the tek screw that is used is the Self-Tapping screw that requires a pilot hole.

16
Step 16 of 33

Drill a pilot hole where the tek screw is going to go using 4mm drill bit.

17
Step 17 of 33

Screw the tek screws to the floor securely.

18
Step 18 of 33

Before installing the flat bar. Mark out where to make the bend in the flat bar and where to drill the hole.

19
Step 19 of 33
<p>Mark out the bend 15mm from where the hole needs to be drilled.</p>

Mark out the bend 15mm from where the hole needs to be drilled.

20
Step 20 of 33
<p>The line is for the bend, and the cross is the mark for where to drill the hole.</p>

The line is for the bend, and the cross is the mark for where to drill the hole.

21
Step 21 of 33

Bend the flat bar a slight amount on the mark.

22
Step 22 of 33
<p>Bend shown.</p>

Bend shown.

23
Step 23 of 33
<p>after making the bend. The drilling mark may need to be marked out again.</p>

after making the bend. The drilling mark may need to be marked out again.

24
Step 24 of 33

Using a 4mm drill bit, drill a pilot hole.

25
Step 25 of 33

Using an 8.5mm drill bit, drill through the 4mm pilot hole.

26
Step 26 of 33
<p>Measure 15mm from the middle of the hole to the end and make a mark to cut.</p>

Measure 15mm from the middle of the hole to the end and make a mark to cut.

27
Step 27 of 33

Cut the excess off.

28
Step 28 of 33
<p>Round the cut with a sander.</p><blockquote><p>Ensure all markings are washed off</p></blockquote><p></p>

Round the cut with a sander.

Ensure all markings are washed off

29
Step 29 of 33

Place the flat bar on the bracket.

Use the step below for extra insight.

30
Step 30 of 33
<p>Fit the flat bar to the outside brackets and put them on the inside bolt.</p>

Fit the flat bar to the outside brackets and put them on the inside bolt.

31
Step 31 of 33

Tighten the two flat bars to the roof using M6 hex head bolt with M6 flat head washer.

32
Step 32 of 33

Tighten the flat bars to the framing

33
Step 33 of 33
<p>Please fill out the hard copy QA sheet included with the product you got.</p><p>Once filled out, please send it back to</p><p><a target="_blank" rel="noopener noreferrer nofollow" href="mailto:charl@camcoindustries.co.nz">charl@camcoindustries.co.nz</a></p><p>If you have issues with instructions and need assistance, please contact.</p><p><a target="_blank" rel="noopener noreferrer nofollow" href="mailto:roman@camcoindustries.co.nz">roman@camcoindustries.co.nz</a></p><p>+64 21 349 001</p><p>&nbsp;</p><p>If the hard copy does not arrive, please contact us.</p><p><a target="_blank" rel="noopener noreferrer nofollow" href="mailto:charl@camcoindustries.co.nz">charl@camcoindustries.co.nz</a></p><p>0800 663 500</p>

Please fill out the hard copy QA sheet included with the product you got.

Once filled out, please send it back to

charl@camcoindustries.co.nz

If you have issues with instructions and need assistance, please contact.

roman@camcoindustries.co.nz

+64 21 349 001


If the hard copy does not arrive, please contact us.

charl@camcoindustries.co.nz

0800 663 500