
Knowby
Assemble a MK4- Australia
1
Step 1 of 26
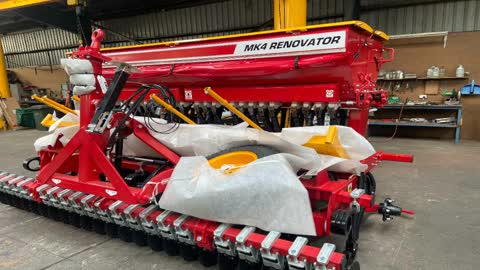
<p>Assembling a MK4 in Australia once out of container.</p>

Assembling a MK4 in Australia once out of container.

2
Step 2 of 26
<p>Check the job number and sales order and check options needed and correct serial number.</p>

Check the job number and sales order and check options needed and correct serial number.

3
Step 3 of 26
<p>Log onto MES and start Job ( See SOP on MES log on)</p>

Log onto MES and start Job ( See SOP on MES log on)

4
Step 4 of 26
<p>Unpack tyre and parts from the MK4 needing to be assembled.</p>

Unpack tyre and parts from the MK4 needing to be assembled.

5
Step 5 of 26
<p>Lower drawbar onto saddle and put turnbuckle ratchet on drawbar.</p>

Lower drawbar onto saddle and put turnbuckle ratchet on drawbar.

6
Step 6 of 26
<p>Sling back of frame and lift up and place stand underneath for safety if fall. Lower crane to take off some slackness from sling.</p>

Sling back of frame and lift up and place stand underneath for safety if fall. Lower crane to take off some slackness from sling.

7
Step 7 of 26
<p>Lift up MK4 corner with crane and sling and place tyre on and tighten bolts.</p>

Lift up MK4 corner with crane and sling and place tyre on and tighten bolts.

8
Step 8 of 26
<p>Get the two outside complete coil tine and boot assembly and clamp assembly ready for both sides. These will be marked L for LHS and R for RHS.</p>

Get the two outside complete coil tine and boot assembly and clamp assembly ready for both sides. These will be marked L for LHS and R for RHS.

9
Step 9 of 26
<p>Loosen and place clamp assembly over frame and insert coil tine through both clamps leaving about a finger gap between coil and clamp as per pic.</p>

Loosen and place clamp assembly over frame and insert coil tine through both clamps leaving about a finger gap between coil and clamp as per pic.

10
Step 10 of 26
<p>Ensure the clamps are within the white markings and slowly tighten each side bolts evenly</p>

Ensure the clamps are within the white markings and slowly tighten each side bolts evenly

11
Step 11 of 26
<p>Ensure the coil tine is flat and even under the frame then tighten bolts ensuring gaps is correct and in within white markings so boot is straight.</p>

Ensure the coil tine is flat and even under the frame then tighten bolts ensuring gaps is correct and in within white markings so boot is straight.

12
Step 12 of 26
<p>Collect the 4 boot assemblies to put on back row coil tines.</p>

Collect the 4 boot assemblies to put on back row coil tines.

13
Step 13 of 26
<p>With frame still lifted in air; place boot tine assembly onto coil tine. Line up to the white line for correct height and then tighten clamp bolts.</p>

With frame still lifted in air; place boot tine assembly onto coil tine. Line up to the white line for correct height and then tighten clamp bolts.

14
Step 14 of 26
<p>Place front bin hose onto front boot tube first; then place rear bin hose onto rear boot tube , so it clicks 2 to 3 times at least.</p>

Place front bin hose onto front boot tube first; then place rear bin hose onto rear boot tube , so it clicks 2 to 3 times at least.

15
Step 15 of 26
<p>Do all the back boots as per pic and ensure hoses are in correct position.</p>

Do all the back boots as per pic and ensure hoses are in correct position.

16
Step 16 of 26
<p>Cable tie the two outside hoses near the frame to avoid hose hitting wheel.</p>

Cable tie the two outside hoses near the frame to avoid hose hitting wheel.

17
Step 17 of 26
<p>Bolt the 4 red upright brackets for the yellow footboard.</p>

Bolt the 4 red upright brackets for the yellow footboard.

18
Step 18 of 26
<p>Crane footboard onto the uprights into position to do bolts up.</p>

Crane footboard onto the uprights into position to do bolts up.

19
Step 19 of 26
<p>Push footboard in towards the bins for transportation. Start on RHS placing the bolts, washers and nuts in loosely leaving the LHS bolts out until you place footboard step into place; the next step.</p>

Push footboard in towards the bins for transportation. Start on RHS placing the bolts, washers and nuts in loosely leaving the LHS bolts out until you place footboard step into place; the next step.

20
Step 20 of 26
<p>Place the footboard step into place and place the two bolts, washers and nuts in and then the nuts can be all tightened up.</p>

Place the footboard step into place and place the two bolts, washers and nuts in and then the nuts can be all tightened up.

21
Step 21 of 26
<p>Put safety rails on and place end one with the foot step latch facing out. Bolt down into place.</p>

Put safety rails on and place end one with the foot step latch facing out. Bolt down into place.

22
Step 22 of 26
<p>Check Lunch box has scales, batteries, calculator, clutch hook, rate chart and correct manual.</p>

Check Lunch box has scales, batteries, calculator, clutch hook, rate chart and correct manual.

23
Step 23 of 26
<p>Complete a MK4 check list sheet ( Sample here is an eco one)</p>

Complete a MK4 check list sheet ( Sample here is an eco one)

24
Step 24 of 26
<p>Strap down lids and seed trays both sides.</p>

Strap down lids and seed trays both sides.

25
Step 25 of 26
<p>Check any options like rear tows or harrows.</p>

Check any options like rear tows or harrows.

26
Step 26 of 26
<p>When assembly is complete, log off the job and tick 1 as complete. Refer SOP for MES. Clean area for next job.</p>

When assembly is complete, log off the job and tick 1 as complete. Refer SOP for MES. Clean area for next job.