
Knowby
Directory sync (SCIM)
Sync members from your Microsoft Entra identity provider automatically using SCIM 2.0.
1
Step 1 of 14

Open Settings (⚙️) and select Directory sync (SCIM) from the sidebar.

2
Step 2 of 14

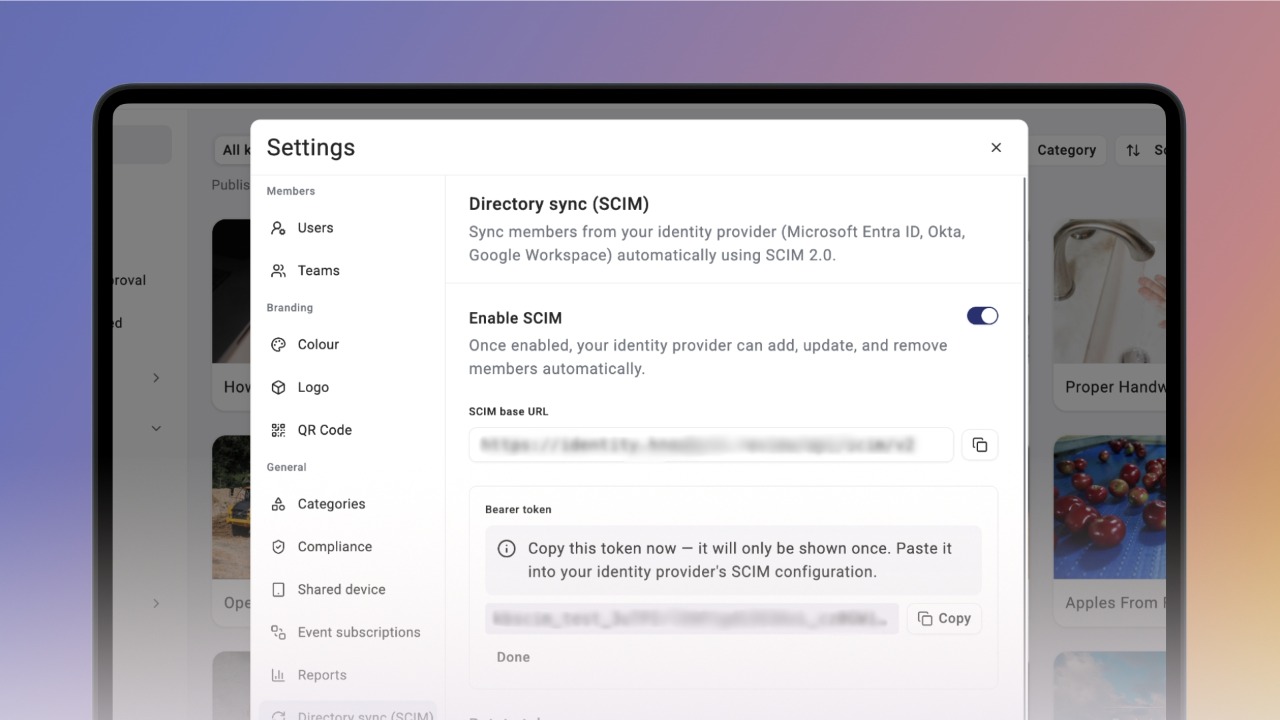
Turn on the Enable SCIM toggle. This generates your SCIM base URL and bearer token.

3
Step 3 of 14

Copy the bearer token now — it's only shown once. You'll paste this into your identity provider's SCIM configuration.

4
Step 4 of 14
<p>Login to your company's Azure Portal.</p><p></p><blockquote style="background-color: var(--k-quote-bg-warning);"><p>If you have already created a Knowby Enterprise App as part of <a target="_blank" rel="noopener noreferrer nofollow" href="https://www.knowby.co/know-how/configure-sso-with-entra-id-for-your-knowby-organisation">Enabling Single Sign-On (SSO) for Knowby with Microsoft Entra ID</a> then skip directly to step 8.</p></blockquote><p><br>If you need to create an enterprise app in Entra ID, then click <strong>Enterprise applications</strong></p>

Login to your company's Azure Portal.

If you have already created a Knowby Enterprise App as part of Enabling Single Sign-On (SSO) for Knowby with Microsoft Entra ID then skip directly to step 8.


If you need to create an enterprise app in Entra ID, then click Enterprise applications

5
Step 5 of 14
<p>Then click <strong>New application</strong></p>

Then click New application

6
Step 6 of 14
<p>Then click <strong>Create your own application</strong></p>

Then click Create your own application

7
Step 7 of 14
<ol><li><p>Under <strong>What's the name of your app?</strong> enter <em>Knowby</em></p></li><li><p>Select <strong>Integrate any other application you don't find in the gallery (Non-gallery) </strong></p></li><li><p>Then click <strong>Create</strong>.</p></li></ol><p></p>
  1. Under What's the name of your app? enter Knowby

  2. Select Integrate any other application you don't find in the gallery (Non-gallery)

  3. Then click Create.

8
Step 8 of 14
<p>In your Knowby enterprise application click <strong>Get started</strong> in the <strong>Provision User Accounts </strong>box.</p>

In your Knowby enterprise application click Get started in the Provision User Accounts box.

9
Step 9 of 14
<p>Then click <strong>Connect your application</strong></p>

Then click Connect your application

10
Step 10 of 14
<ol><li><p>Ensure <strong>Bearer authentication</strong> is selected. </p></li><li><p>Paste the bearer token you copied in Step 3 into the <strong>Secret token</strong> field.</p></li></ol><p></p>
  1. Ensure Bearer authentication is selected.

  2. Paste the bearer token you copied in Step 3 into the Secret token field.

11
Step 11 of 14

Navigate back to Knowby Pro and copy the SCIM base URL — this is the endpoint your identity provider will sync against.

12
Step 12 of 14
<p>Paste the <strong>SCIM base URL</strong> into the <strong>Tenant URL field</strong>, then click <strong>Test Connection</strong> — it should return <em>success</em> if the URL and token are correct.</p>

Paste the SCIM base URL into the Tenant URL field, then click Test Connection — it should return success if the URL and token are correct.

13
Step 13 of 14

If you ever need to revoke access, use Rotate token to generate a new bearer token — the old one stops working immediately.

You will need to update your Knowby enterprise application in your Azure Portal to get SCIM provisioning working again.

14
Step 14 of 14

To turn off user provisioning at any time, switch Enable SCIM off.