
Knowby
xRadar Prep, DMax WITH Tub
1
Step 1 of 15

NOTE: These instructions are only for a DMax WITH a Tub. Different instructions if it is a DMax "Cab Chassis" or any Mazda BT50

2
Step 2 of 15

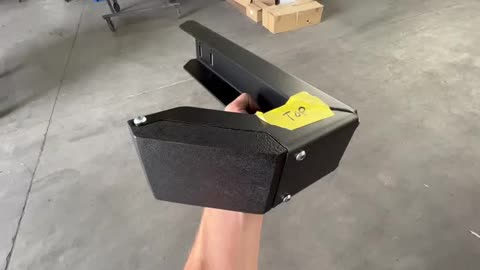
Pass side shown, this is how it will look. Notice the 3D printed part says "TOP" on the inside.

3
Step 3 of 15
<p>Will supply as a pair</p>

Will supply as a pair

4
Step 4 of 15
<p>Get the 2 brackets (made by Bronco), always powder coated matte Black</p>

Get the 2 brackets (made by Bronco), always powder coated matte Black

5
Step 5 of 15
<p>Get the 3D printed parts, part number is BSB045</p>

Get the 3D printed parts, part number is BSB045

6
Step 6 of 15
<p>They will come with fasteners</p>

They will come with fasteners

7
Step 7 of 15
<p>Insert nuts into the 3D printed brackets</p>

Insert nuts into the 3D printed brackets

8
Step 8 of 15
<p>There are 4 per bracket</p>

There are 4 per bracket

9
Step 9 of 15
<p>Will fit like this to the steel bracket</p>

Will fit like this to the steel bracket

10
Step 10 of 15
<p>If required, grind it so it is narrower (change made Jan 2022 so hopefully this step not required in future)</p>

If required, grind it so it is narrower (change made Jan 2022 so hopefully this step not required in future)

11
Step 11 of 15
<p>4mm hex head to tighten</p>

4mm hex head to tighten

12
Step 12 of 15

Fit 3D printed part to bracket, and tighten (not too tight!) the bolts

Note the TOP

13
Step 13 of 15
<p>Write &quot;Top&quot; and which side it is, &quot;Pass&quot; and &quot;Driv&quot;. This makes it easier for the person fitting these to the vehicle.</p>

Write "Top" and which side it is, "Pass" and "Driv". This makes it easier for the person fitting these to the vehicle.

14
Step 14 of 15
<p>Add Fasteners; 
4 x M12x 40 fine thread
4 x big flat washer</p>

Add Fasteners;  4 x M12x 40 fine thread 4 x big flat washer

15
Step 15 of 15

Package it up, and put in Tray