Knowby Grants
Knowby
Upload to NLIS data base
1
Step 1 of 20
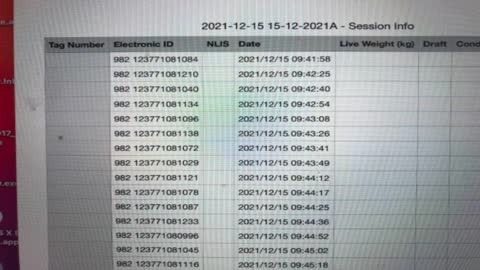
<p>Sessions from a scanner uploaded as CRV files like this</p>

Sessions from a scanner uploaded as CRV files like this

2
Step 2 of 20
<p>Put the cursor over the number 1, right click and select delete row</p>

Put the cursor over the number 1, right click and select delete row

3
Step 3 of 20
<p>Put the cursor on any of the letters ( A,B,C etc ) at the top of a blank column ( before or between existing data but not after the last data column) right click and delete column</p>

Put the cursor on any of the letters ( A,B,C etc ) at the top of a blank column ( before or between existing data but not after the last data column) right click and delete column

4
Step 4 of 20
<p>Put the cursor and highlight the column with dates in it and hit the delete button ( not delete column )</p>

Put the cursor and highlight the column with dates in it and hit the delete button ( not delete column )

5
Step 5 of 20

Now put the date in only in this order: Day month year Make sure the day and month have two digits ( eg 04 not 4) and the year has four digits  07/06/2022

6
Step 6 of 20
<p>Now copy and paste the date down the entire column</p>

Now copy and paste the date down the entire column

7
Step 7 of 20
<p>If the date isn’t showing in right format you need to highlight the cell. Then choose format top right, cell and set to the correct format plus none for time.</p>

If the date isn’t showing in right format you need to highlight the cell. Then choose format top right, cell and set to the correct format plus none for time.

8
Step 8 of 20

Use today’s date

9
Step 9 of 20
<p>In the next three columns in Capitals put JD, JDV and on</p>

In the next three columns in Capitals put JD, JDV and on

10
Step 10 of 20
<p>Now copy and paste so the entire columns are filled like this</p>

Now copy and paste so the entire columns are filled like this

11
Step 11 of 20
<p>Now under file select export to and CSV</p>

Now under file select export to and CSV

12
Step 12 of 20

Select next and then export it to documents or desktop

13
Step 13 of 20
<p>Database at nlis.com.au
Sign in with Tas dairy systems email and Landers15!</p>

Database at nlis.com.au Sign in with Tas dairy systems email and Landers15!

14
Step 14 of 20
<p>Go to nlis</p>

Go to nlis

15
Step 15 of 20
<p>Hit log in</p>

Hit log in

16
Step 16 of 20
<p>Now log into the database and select device status and go</p>

Now log into the database and select device status and go

17
Step 17 of 20
<p>Select I want to upload a file</p>

Select I want to upload a file

18
Step 18 of 20
<p>Select choose file and then upload the CSV file you’ve just created
Now press continue</p>

Select choose file and then upload the CSV file you’ve just created Now press continue

19
Step 19 of 20
<p>Now send the file</p>

Now send the file

20
Step 20 of 20
<p>If you are successful this screen will come up if not there will be red writing on it highlighting your problems</p>

If you are successful this screen will come up if not there will be red writing on it highlighting your problems