Knowby Heg Automotive Pty Ltd
Knowby
OTA 250 Prado Rear Flare Extension | Installation instructions
Follow these instructions to install the flare extensions onto your Rear Fender Flares.
1
Step 1 of 9
<p>Collect all tools required for installtion:</p><p></p><ol><li><p>6x Supplied push clips</p></li><li><p>2x Supplied Extension Pieces</p></li><li><p>Marking Tape</p></li><li><p>Drill</p></li><li><p>3.5mm Drill Bit</p></li><li><p>7mm Drill Bit</p></li><li><p>Marker</p></li></ol><p></p>

Collect all tools required for installtion:

  1. 6x Supplied push clips

  2. 2x Supplied Extension Pieces

  3. Marking Tape

  4. Drill

  5. 3.5mm Drill Bit

  6. 7mm Drill Bit

  7. Marker

2
Step 2 of 9
<p>Prep the surface of the flare by cleaning with a clean rag and some cleaning alcohol/Product.</p>

Prep the surface of the flare by cleaning with a clean rag and some cleaning alcohol/Product.

3
Step 3 of 9
<p>Apply masking tape to the flare where you will be marking.</p>

Apply masking tape to the flare where you will be marking.

4
Step 4 of 9
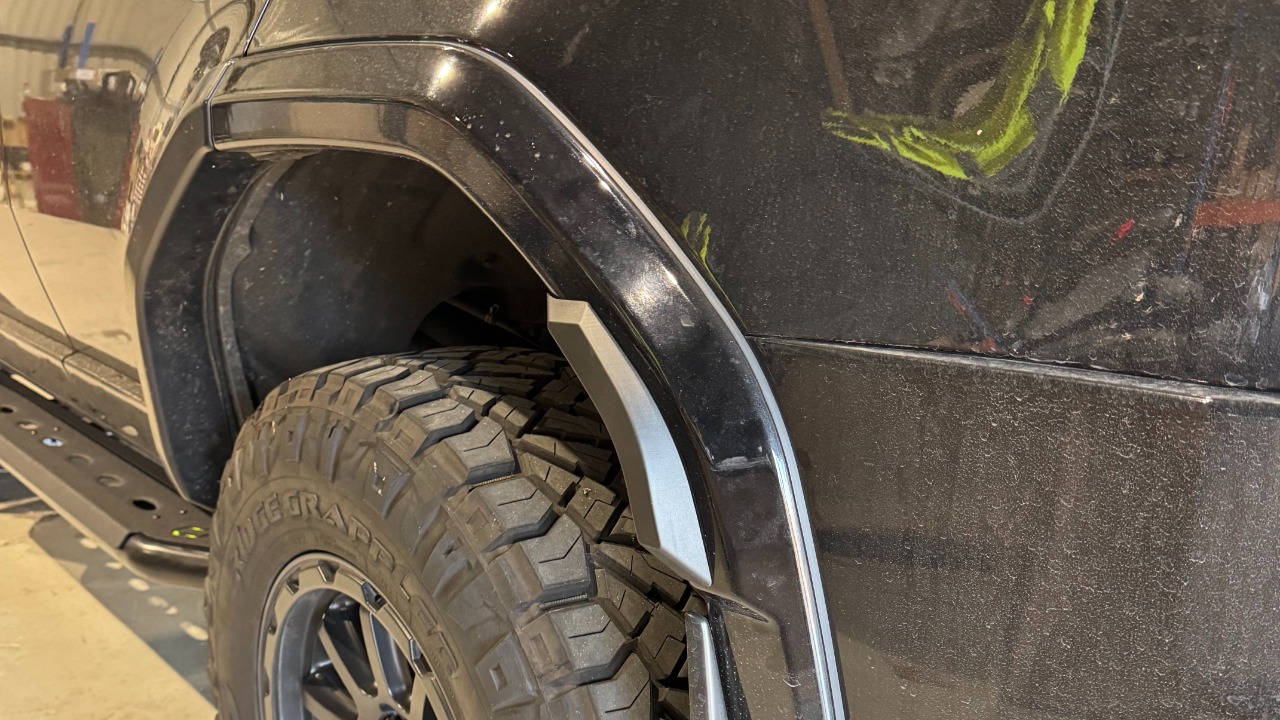
<p>Place and align the OTA extension piece onto the flare and mark the 3 holes using a Marker.</p><p><em>Note: It is important that you align the piece with the tapered edge on the outside of the flare.</em></p>

Place and align the OTA extension piece onto the flare and mark the 3 holes using a Marker.

Note: It is important that you align the piece with the tapered edge on the outside of the flare.

5
Step 5 of 9
<p>Image reference to show alignment</p>

Image reference to show alignment

6
Step 6 of 9
<p>Using a 3.5mm Drill bit, pre-drill the 3x marked holes.</p>

Using a 3.5mm Drill bit, pre-drill the 3x marked holes.

7
Step 7 of 9
<p>After pre-drilling with a 3.5mm drill bit, use a 7mm drill bit to enlargen the holes.</p>

After pre-drilling with a 3.5mm drill bit, use a 7mm drill bit to enlargen the holes.

8
Step 8 of 9
<p>Now fit the extension piece back in place and fix using 3x suppplied push clips.</p>

Now fit the extension piece back in place and fix using 3x suppplied push clips.

9
Step 9 of 9
<p>Repeat steps 2-8 on the other side and the installation is complete. </p>

Repeat steps 2-8 on the other side and the installation is complete.