
Knowby
xWiring, RAM 1500, "DS" Model
1
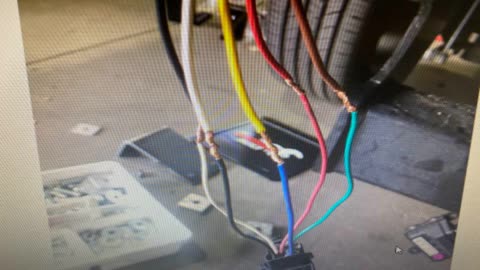
Step 1 of 37

WARNING: There are 2 variants of the wiring. Either the “Laramie” or  “Express”. Depending on the vehicle.

They are quite different! Follow steps 2-8 for Laramie.

All further steps are for Express.

2
Step 2 of 37

Cut off the original tail light plugs (which come on tub). They will be reused.

3
Step 3 of 37
<p>A “Plug and Play” harness is not yet available for this vehicle,  so it is Necessary to rewire original  plugs.  Blue=Yellow 
Red=Red
Green=Brown
Black=White 
White=Black</p>
<p>Repeat for opposite side</p>

A “Plug and Play” harness is not yet available for this vehicle,  so it is Necessary to rewire original  plugs.  Blue=Yellow  Red=Red Green=Brown Black=White  White=Black

Repeat for opposite side

4
Step 4 of 37
<p>RAM lic plate harness ( it will be pre fitted to tray)</p>

RAM lic plate harness ( it will be pre fitted to tray)

5
Step 5 of 37
<p>Identify and trim the vehicles license plate harness</p>

Identify and trim the vehicles license plate harness

6
Step 6 of 37
<p>Wire it to supplied licence plate harness</p>
<p>Brown = White (vehicle side)
White = Black (vehicle side)</p>

Wire it to supplied licence plate harness

Brown = White (vehicle side) White = Black (vehicle side)

7
Step 7 of 37
<p>Neatly zip tie  wiring</p>

Neatly zip tie  wiring

8
Step 8 of 37
<p>Remount unit</p>

Remount unit

9
Step 9 of 37

With a 2nd person, check all functions are working correctly.  park-brake-indicators-reverse

10
Step 10 of 37

End of Laramie Wiring, start of Express wiring

11
Step 11 of 37

Identify original plugs. On this model, on the vehicle, there are 2 plugs per tail light.....

12
Step 12 of 37
<p>Trim plugs off end.</p>

Trim plugs off end.

13
Step 13 of 37
<p>Strip wires back</p>

Strip wires back

14
Step 14 of 37

Identify the supplied Tail light harness (it will be connect to Tray tail lights)

15
Step 15 of 37
<p>Strip wires</p>

Strip wires

16
Step 16 of 37
<p>Black (on vehicle) to white</p>

Black (on vehicle) to white

17
Step 17 of 37
<p>White (on vehicle) to Yellow</p>

White (on vehicle) to Yellow

18
Step 18 of 37
<p>Red (on vehicle) to red</p>

Red (on vehicle) to red

19
Step 19 of 37
<p>Brown (on vehicle) to Brown</p>

Brown (on vehicle) to Brown

20
Step 20 of 37
<p>Trim vehicle black  - it is not used.</p>

Trim vehicle black - it is not used.

21
Step 21 of 37
<p>Should now Look like this</p>

Should now Look like this

22
Step 22 of 37

Identify the original licence plate assembly

23
Step 23 of 37
<p>Trim tail off the back</p>

Trim tail off the back

24
Step 24 of 37
<p>Strip ends</p>

Strip ends

25
Step 25 of 37
<p>Wire, approx 2m
(You need to supply this)</p>

Wire, approx 2m (You need to supply this)

26
Step 26 of 37
<p>Join pass side black wire (reverse) to Drivers side black (reverse) wire</p>

Join pass side black wire (reverse) to Drivers side black (reverse) wire

27
Step 27 of 37
<p>Connect trimmed plug to original harness (this is where we will get power for the reverse circuit)</p>

Connect trimmed plug to original harness (this is where we will get power for the reverse circuit)

28
Step 28 of 37
<p>Connect the white wire only</p>
<p>Trim black</p>

Connect the white wire only

Trim black

29
Step 29 of 37
<p>This join happens in the Middle</p>
<p>(of the wire that connect pass side reverse to drivers side revers)</p>

This join happens in the Middle

(of the wire that connect pass side reverse to drivers side revers)

30
Step 30 of 37
<p>Identify</p>

Identify

31
Step 31 of 37
<p>Harness</p>

Harness

32
Step 32 of 37
<p>Wire it to vehicle licence plate harness Brown = White White = Black</p>

Wire it to vehicle licence plate harness Brown = White White = Black

33
Step 33 of 37
<p>Solder</p>

Solder

34
Step 34 of 37
<p>Insulation</p>

Insulation

35
Step 35 of 37

Check, neatly wire

36
Step 36 of 37

Looks like this

37
Step 37 of 37

With a 2nd person, check all functions are working correctly.  park-brake-indicators-reverse