Knowby
PLY FLOOR, MCALPINE HUSSMANN
1
Step 1 of 26
2
Step 2 of 26

Contents

STEP 3: Components List

STEP 4: Tools List

STEP 5: Torque Values

STEP 6: Fitting Ply

STEP 26: QA Sheet

3
Step 3 of 26
<p></p>

4
Step 4 of 26
<p>Tools List</p>

Tools List

5
Step 5 of 26
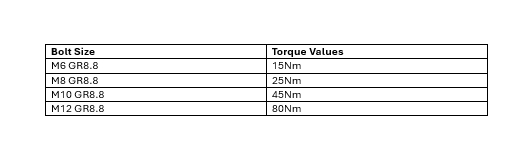
<p>Torque Values</p>

Torque Values

6
Step 6 of 26
<p>Fit the ply with the arrows to the front of the wellside first</p>

Fit the ply with the arrows to the front of the wellside first

7
Step 7 of 26
<p>Fit the bottom piece of ply second. Fit to where the arrows are shown.</p>

Fit the bottom piece of ply second. Fit to where the arrows are shown.

8
Step 8 of 26

Fit the front corner Canopy fitting kit bracket before fitting the rest of the ply.

9
Step 9 of 26
<p>Fit the rear fitting kit bracket before fitting the rest of the ply.</p>

Fit the rear fitting kit bracket before fitting the rest of the ply.

10
Step 10 of 26

Using tape prep, prep the wellside as shown.

11
Step 11 of 26

Fit the tape to the side piece as shown.

12
Step 12 of 26

Lift the side into the wellside.

13
Step 13 of 26

Fit the ply to the side and ensure the tape is stuck to the wellside.

14
Step 14 of 26

Remove the screws from the spot shown.

15
Step 15 of 26

Remove the screw from the spot shown and remove the board to be able to access the wheel arch.

16
Step 16 of 26
<p>Fit the wedge to the front right of the ply floor.</p>

Fit the wedge to the front right of the ply floor.

17
Step 17 of 26

Screw the side piece of plywood to the plywood floor.

18
Step 18 of 26

Screw the side piece to the front of the wellside.

19
Step 19 of 26

Fit the ply back to cover the wheel arch.

20
Step 20 of 26

Screw the ply back

21
Step 21 of 26

Screw the ply back

22
Step 22 of 26

Fit the tailgate ply. Fit the top 2 screws first.

23
Step 23 of 26

Test that the tailgate can still shut.

24
Step 24 of 26

Screw the bottom holes down.

25
Step 25 of 26

Drill a pilot hole for the top middle hole and then screw it to the tailgate.

26
Step 26 of 26
<p>Please fill out the hard copy QA sheet included with the product you got.</p><p>Once filled out, please send it back to</p><p><a target="_blank" rel="noopener noreferrer nofollow" href="mailto:charl@camcoindustries.co.nz">charl@camcoindustries.co.nz</a></p><p>If you have issues with instructions and need assistance, please contact.</p><p><a target="_blank" rel="noopener noreferrer nofollow" href="mailto:roman@camcoindustries.co.nz">roman@camcoindustries.co.nz</a></p><p>+64 21 349 001</p><p>&nbsp;</p><p>If the hard copy does not arrive, please contact us.</p><p><a target="_blank" rel="noopener noreferrer nofollow" href="mailto:charl@camcoindustries.co.nz">charl@camcoindustries.co.nz</a></p><p>0800 663 500</p>

Please fill out the hard copy QA sheet included with the product you got.

Once filled out, please send it back to

charl@camcoindustries.co.nz

If you have issues with instructions and need assistance, please contact.

roman@camcoindustries.co.nz

+64 21 349 001


If the hard copy does not arrive, please contact us.

charl@camcoindustries.co.nz

0800 663 500