
Personal Protective Equipment Required (PPE)
Safety Glasses
Steel Toe Boots
High Visibility Vest
Long sleeves and pants
Hearing Protection
Chemical Handling Gloves
Hazards / Controls
Chemical Handling
Manual Handling
Slip / Trip
Pinch Point
Glass
Quality
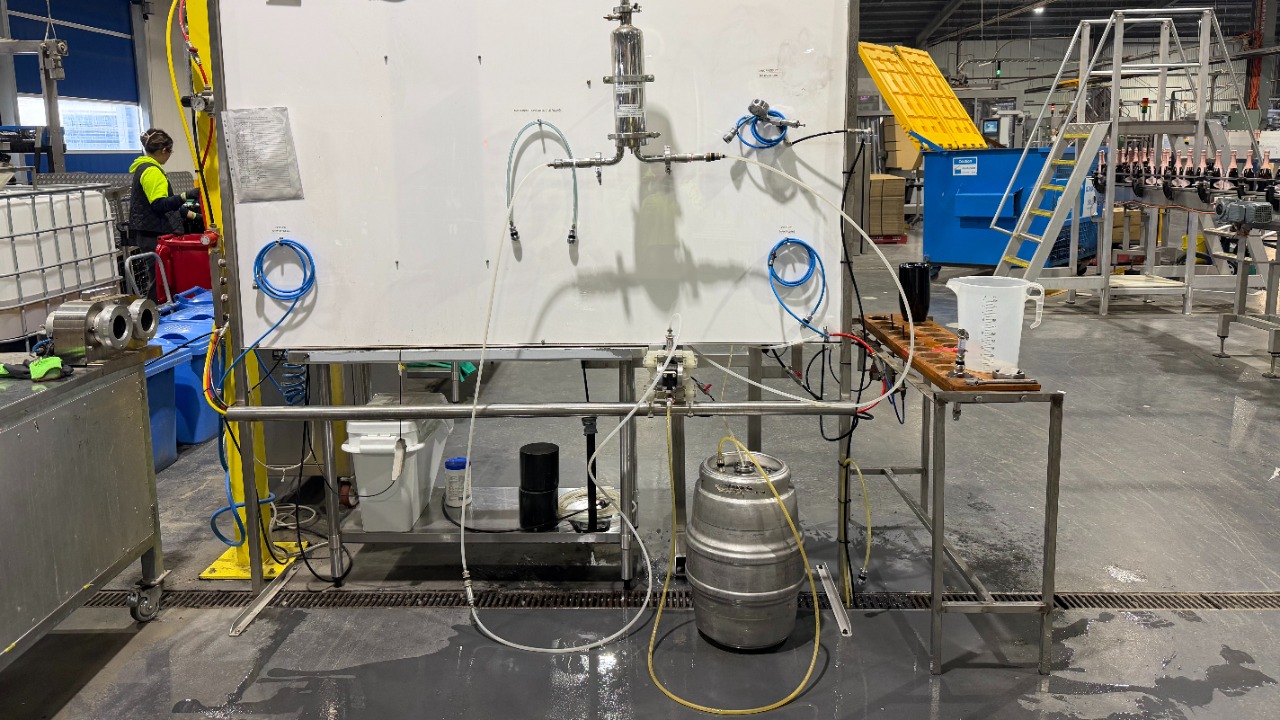
Connecting the line ready for clean
Connect (Yellow) supply line to the supply labeled fitting on the CIP KEG.
Connect the FLOW line to the left side connection of the filter.
Ensure the line on the right side of the FILTER that leads to the sight glass is connected to the FILTER.
Put the thin line that leads to the front of the filler into the CIP KEG. It should already be connected at the front filler from the previous end of shift clean.
Turning on light + Computer set up
Head over to the PowerPoint and turn on the right port (white lead).
Wait for the screen on the computer to boot up. You will see a message saying, "Emergency stop active OR Back door open".
Press "Machine Reset" until the message disappears. This normally takes a few presses until the message disappears.
Press "CIP" option on the screen then select "YES".
Press "FILL VALVE" and the beneath message should change to "VALVE ON" and appear in green.

Chemical Gloves Location
Below the main desk is where the chemical gloves are kept, put these on now.
Turning on Air and C02 Valve
Go over behind the TIRAGE LINE
Turn on the bottom blue valve (AIR) as shown in video.
Above turn on the red C02 valve as shown in video.

Handling Chemicals
(PPE Chemical gloves & safety glasses required)
Pour the ALLEGRO into the jug and fill to the first line as shown in the photo.
Pour the PERCITRA into the other jug to the first line as shown in the photo.
Make sure both lids are secure on each chemical container and head back over to the magnum line with both jugs.

(PPE Chemical gloves & safety glasses required)
Pour ALLEGRO into the CIP KEG.
Pour 3L of HOT water into the CIP KEG.
After the chemical is poured into the CIP KEG, rinse the chemical jug out with hot water and tip down the drain.
Return chemical jug to chemical area behind TIRAGE.
First Wash Cycle 10 Minutes
(PPE Chemical gloves & safety glasses required)
Ensure the door of the filler is closed.
Turn on the red valve slowly until you hear the system make a ticking noise as shown in the video (this means the air is pumping through as it should).
The chemical and water should be visible after a few seconds through the sight glass at the whiteboard as shown in the video, it is normal for some water to leak from the filler during this process.
Let the cycle run for 10 minutes.
Draining after wash is complete
(PPE Chemical gloves & safety glasses required)
Disconnect the line on the right side of the FILTER and connect it to the drain fitting labeled DRAIN on the CIP KEG. The sight glass at the whiteboard should begin to drain. Once drained rest it back onto the FILTER without fully connecting it.
Disconnect the left FILTER line from the FLOW line and connect it to the drain fitting labeled DRAIN on the CIP KEG. once it has drained disconnect from the CIP KEG.
Connect the FLOW line into the connection that leads into the warehouse drain as shown in the video and turn the air on to pump the chemical / water used in the CIP KEG down the drain.
Connecting the line ready for the 2nd chemical clean. This is exactly the same as the morning setup step.
Connect (yellow) supply line to the supply labeled fitting on the CIP KEG.
Connect the FLOW line to the left side connection of the filter.
Ensure the line on the right side of the FILTER that leads to the sight glass is connected to the FILTER.
Put the thin line that leads to the front of the filler into the CIP KEG.

(PPE Chemical gloves & safety glasses required)
Pour PERCITRA into the CIP KEG.
Pour 3L of HOT water into the CIP KEG.
After the chemical is poured into the CIP KEG, rinse the chemical jug out with hot water and tip down the drain.
Return chemical jug to chemical area behind TIRAGE.
Second Wash Cycle 10 Minutes
(PPE Chemical gloves & safety glasses required)
Ensure the door of the filler is closed.
Turn on the red valve slowly until you hear the system make a ticking noise as shown in the video (this means the air is pumping through as it should).
The chemical and water should be visible after a few seconds through the sight glass at the whiteboard as shown in the video, it is normal for some water to leak from the filler during this process.
Let the cycle run for 10 minutes.
Draining after wash is complete
(PPE Chemical gloves & safety glasses required)
Disconnect the line on the right side of the FILTER and connect it to the drain fitting labeled DRAIN on the CIP KEG. The sight glass at the whiteboard should begin to drain. Once drained rest it back onto the FILTER without fully connecting it.
Disconnect the left FILTER line from the FLOW line and connect it to the drain fitting labeled DRAIN on the CIP KEG. once it has drained disconnect from the CIP KEG.
Connect the FLOW line into the connection that leads into the warehouse drain as shown in the video and turn the air on to pump the chemical / water used in the CIP KEG down the drain.

(PPE Chemical gloves & safety glasses required)
Rinse out CIP KEG with hose for approximately 10 seconds.
Tip CIP KEG upside down over the drain to remove any soap that may still be in the CIP KEG.
Repeat this step until all soap has been cleaned out from the CIP KEG and you start to only see clear water come out.
Connecting the line ready for the 3rd and final clean. This is exactly the same as the morning setup step.
(PPE Chemical gloves & safety glasses required)
Connect (yellow) supply line to the supply labeled fitting on the CIP KEG.
Connect the FLOW line to the left side connection of the filter.
Ensure the line on the right side of the FILTER that leads to the sight glass is connected to the FILTER.
Put the thin line that leads to the front of the filler into the CIP KEG.

3rd and final clean
(PPE Chemical gloves & safety glasses required)
Pour 5L of COLD water into the CIP KEG.
This cycle will be the final wash. This cycle runs for 15 MINUTES.
3rd and final clean (15 MINUTES)
(PPE Chemical gloves & safety glasses required)
Ensure the door of the filler is closed.
Turn on the red valve slowly until you hear the system make a ticking noise as shown in the video (this means the air is pumping through as it should).
The water should be visible after a few seconds through the sight glass at the whiteboard as shown in the video, it is normal for some water to leak from the filler during this process.
During this cycle head up to the winery to turn on C02. Exit through DISGORGE END DOOR. See next slide.

Turning On C02 at Winery
Stay alert for passing forklifts / vehicles at all times
Walk up through the winery gates.

Turning On C02 at Winery
Use pictures provided as a reference for location
Turn the GREEN Valve on.
Turn the DARK GREEN Valve on.
Head back down to production, stay alert for passing forklifts / vehicles at all times.
Draining after wash is complete
(PPE Chemical gloves & safety glasses required)
Disconnect the line on the right side of the FILTER and connect it to the drain fitting labeled DRAIN on the CIP KEG. The sight glass at the whiteboard should begin to drain. Once drained rest it back onto the FILTER without fully connecting it.
Disconnect the left FILTER line from the FLOW line and connect it to the drain fitting labeled DRAIN on the CIP KEG. once it has drained disconnect from the CIP KEG.
Connect the FLOW line into the connection that leads into the warehouse drain as shown in the video and turn the air on to pump the chemical / water used in the CIP KEG down the drain.