
Click the "+" button in the bottom right corner – or the "+ Create" button next to the search bar – then select "Create knowby from scratch" to open the editor.
Firstly, select your base language. This is the language you will use to create your knowby and will serve as the source for all future translations. Select your language from the list and confirm.
Note: This is a one-time setup and cannot be changed later.
First, you’ll see the "Details" tab. Start by uploading a cover image – click Browse in the gray area or drag and drop an image in. Crop it to 16:9.
Every change is saved automatically – if you close the tab or lose connection, your progress is kept as a draft.
Click the Title field and enter the name of your knowby (max 60 characters).
In the Description field, add a short summary of what this guide covers (max 280 characters).
Optionally, you can also set:
📅 Next review date — when this guide should be reviewed
⏱️ Estimated completion time – how long you expect the user to need to complete the knowby, shown to users on the start screen
🔍 Internal reference ID — for faster search
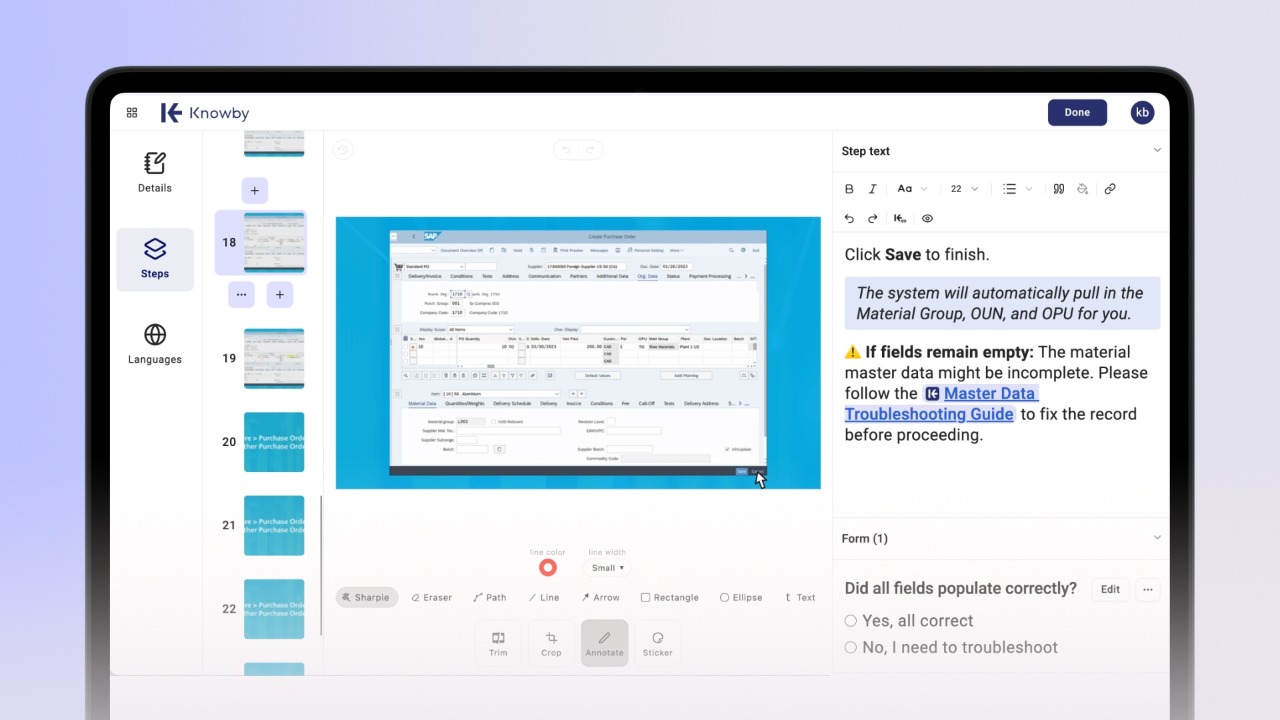
Click the Steps tab on the left to start building your steps. You'll see step thumbnails on the left, a media upload area in the center, and a text area on the right.
To add media to a step click Browse or drag and drop a file into the gray area.
After uploading, you can edit your media using the built-in editor:
✂️ Trim videos by dragging the blue bars
🔲 Crop to your preferred ratio (16:9, 3:4, square, etc.)
✏️ Annotate with lines, shapes, and text
🎯 Add stickers for emphasis
To add a new step, click the "+" button below the current step (highlighted in purple) in the thumbnails of steps panel on the left.
To reorder steps – drag and drop them using the thumbnail panel, or use the three-dot menu next to the + button for Move up, Move down, and Delete options.
You can move steps by holding the current step (highlighted in purple) and dragging it to a new position between the steps.
Add instructional text for each step. The text editor supports:
B Bold, I Italic
Aa Heading styles with font size control
Numbered and bulleted lists
Blockquotes with colours
Hyperlinks
Linked knowbys – reference another guide directly in the step
You can add a form field to any step to collect responses, confirmations, or images from users. In the Steps tab, open the Form panel on the right and add your field.
Available field types: short answer, long answer, checkbox, single choice, multiple choice, dropdown, and image upload.
To add translations to your knowby, click the Languages tab on the left side of the screen.
On this screen, you’ll see:
A language management panel at the top – for adding, deleting, and tracking verified translations.
Thumbnails of steps on the left for navigation.
Text boxes – the original text on the left (editable only from other tabs) and the translation on the right.
To add a language, type in the search bar and click the language you need.
The system will automatically translate your title, description, and all steps.
Translations are labeled Unverified until you review them.
Review each step's translation in the text box on the right. When it's correct, check Translation verified. Once all steps are verified, a green checkmark appears next to the language.
💡 You can add multiple languages. Even unverified translations will still appear in the knowby as an automated translation in the list.
If the text in any step or in Details is updated after translation, the system will show a red badge on the Languages tab. When you open it, a banner will highlight which steps have changed and mark the language as no longer verified.
To re-verify, click the flagged steps and hit Update Translation – or update the text manually and check Translation verified.
When you're done, click Done in the top right. You'll land on the draft preview screen — ready to publish.
See the