Knowby
DRAWERS, GENERIC DC DOUBLE DRAWERS
1
Step 1 of 18
2
Step 2 of 18

Contents

Step 3. Components List

Step 5. Tools Required

STEP 6: Torque Values

STEP 7: Drilling Diagrams

STEP 9: Drawer Fitting Prep

STEP 10: Drawer Installation

STEP 18: QA Sheet

3
Step 3 of 18
<p>Component List</p>

Component List

4
Step 4 of 18
5
Step 5 of 18
<p>Tool List</p>

Tool List

6
Step 6 of 18
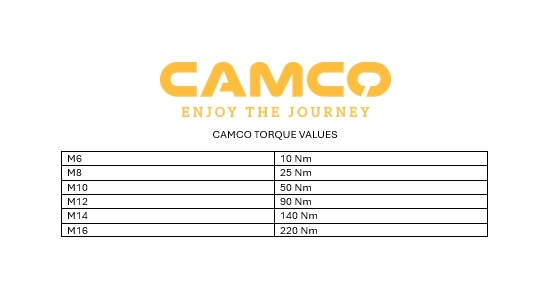
<p>Torque Values</p>

Torque Values

7
Step 7 of 18
8
Step 8 of 18
<p>Bolt/drill holes for each vehicle.</p><blockquote><p>Use the information in the step above to see which holes each vehicle uses.</p></blockquote><p></p>

Bolt/drill holes for each vehicle.

Use the information in the step above to see which holes each vehicle uses.

9
Step 9 of 18
<p>Before fitting the drawer, install the low-profile bar into the correct mounting hole for your specific vehicle model, as shown in the diagram in Step 7.</p>

Before fitting the drawer, install the low-profile bar into the correct mounting hole for your specific vehicle model, as shown in the diagram in Step 7.

10
Step 10 of 18

Lift the drawer into the wellside of the ute. This can be done using a workshop forklift or with the assistance of four to six people to ensure the unit is lifted safely and correctly.

11
Step 11 of 18
<p>Measure both sides of the drawer to ensure the drawer is perfectly centred within the wellside.</p>

Measure both sides of the drawer to ensure the drawer is perfectly centred within the wellside.

12
Step 12 of 18

Check that the tailgate closes fully with the drawer installed.

Drill the required mounting hole specific to the ute model being fitted.

Use a drill stop when drilling.

13
Step 13 of 18
<p>Use an M8 × 35 hex head bolt when a liner is fitted or an M8 × 25 hex head bolt when no liner is fitted, install an M8 flat washer on top and an M8 penny washer underneath, then secure everything with an M8 nyloc nut.</p>

Use an M8 × 35 hex head bolt when a liner is fitted or an M8 × 25 hex head bolt when no liner is fitted, install an M8 flat washer on top and an M8 penny washer underneath, then secure everything with an M8 nyloc nut.

14
Step 14 of 18

Tighten it to spec.

15
Step 15 of 18

Drill a hole through the low-pro bar in the wellside, ensuring there are no obstructions underneath, and use a drill stop to control the drilling depth.

16
Step 16 of 18
<p>Use an M8 × 35 hex head bolt when a liner is fitted or an M8 × 25 hex head bolt when no liner is fitted, install an M8 flat washer on top and an M8 penny washer underneath, then secure everything with an M8 nyloc nut.</p>

Use an M8 × 35 hex head bolt when a liner is fitted or an M8 × 25 hex head bolt when no liner is fitted, install an M8 flat washer on top and an M8 penny washer underneath, then secure everything with an M8 nyloc nut.

17
Step 17 of 18

Tighten to spec.

18
Step 18 of 18
<p>Please fill out the hard copy QA sheet included with the product you got.</p><p>Once filled out, please send back to</p><p><a target="_blank" rel="noopener noreferrer nofollow" href="mailto:charl@camcoindustries.co.nz">charl@camcoindustries.co.nz</a> </p><p></p><p></p><p>If the hard copy does not arrive, please contact us</p><p></p><p><a target="_blank" rel="noopener noreferrer nofollow" href="mailto:charl@camcoindustries.co.nz">charl@camcoindustries.co.nz</a></p><p></p><p>0800 663 500</p>

Please fill out the hard copy QA sheet included with the product you got.

Once filled out, please send back to

charl@camcoindustries.co.nz

If the hard copy does not arrive, please contact us

charl@camcoindustries.co.nz

0800 663 500