
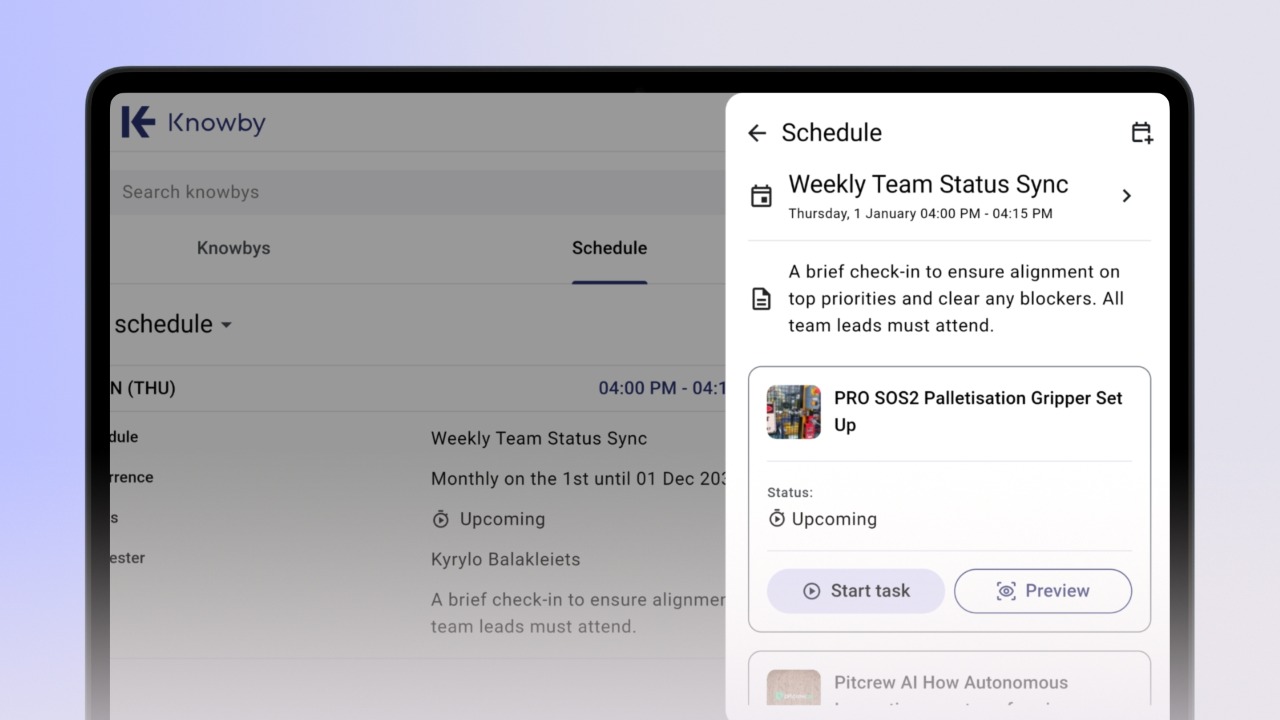
Everything starts in the Schedule tab. What you see depends on your role:
Members: My Schedule and Scheduled by Me
Admins: My Schedule, Scheduled by Me, and All Schedules
Each board gives users quick access to what they’ve created and what has been assigned to them.
Click "Add Schedule" to begin. Enter a title so assignees immediately understand the purpose, then choose the knowbys to include. The list is sorted by most recently published — you can add multiple knowbys and reorder them as needed.
Select one or more assignees. The Requester field defaults to you but can be changed to someone else if needed.
Set the start date and time – defaults to today, but any future date works.
Set the Duration to define how long assignees have to complete everything– defaults to 15 minutes, with a maximum of 23 hours.
⏱️ If your team spans time zones, adjust the time zone field by typing a city, country, or continent name.
By default, the system uses your device’s time zone.
To repeat the schedule automatically, add a recurrence rule. Quick options include Daily, Weekly, Monthly, Annually, and Weekdays.
For custom intervals, open Custom Recurrence.
Add an optional note (up to 280 characters) – it appears in notifications and schedule details.
Then click "Create".
The system generates one task per assignee, and each person receives an email with the start time, assigned knowbys, assignees, recurrence details, and note.

The email also includes an ICS calendar attachment so the user can add the event to Google Calendar, Outlook, or any other calendar.
For recurring schedules, the ICS file includes all repeating events.
After creation, both the requester and the assignee see the schedule in their boards.
Requesters and Admins can see task statuses per assignee, edit or cancel the schedule, filter by assignee, status, or knowby, and expand individual occurrences for recurring schedules.
These boards are for managing only — tasks are started from My Schedule.
To start a task, the assignee goes to My Schedule and clicks the row to open the Schedule Details drawer.
Here they'll see the title, note, full schedule info, a calendar download option, and the list of knowbys with actions: Start, Resume, Restart, or Preview.
Choosing Preview opens the knowby in read-only mode — fields cannot be filled and completion cannot begin.
From the top bar of the Preview screen, the user can start the task at any time.
Starting the task opens the knowby in completion mode.
The task status updates to In Progress, which is visible both to:
the assignee in My Schedule
the requester/admin in Scheduled by Me or All Schedules
The assignee can pause and resume the task at any time.
When finished, all boards update automatically. The status becomes Completed – or Completed Late if finished after the deadline.
A "View Completion" button becomes available for both the assignee and the requester, along with the completion date and time.