
Knowby
Boiler valve install
Drain system and install new valves where required
1
Step 1 of 25
<p>Install I beam props at required locations.</p>

Install I beam props at required locations.

2
Step 2 of 25
<p>Install valve access scaffold at required location.</p>

Install valve access scaffold at required location.

3
Step 3 of 25
<p>Install valve installation</p>
<p>scaffold at required location.</p>

Install valve installation

scaffold at required location.

4
Step 4 of 25
<p>Shut down all boiler room systems and field systems in conjunction with Dennis. ( see separate process)</p>

Shut down all boiler room systems and field systems in conjunction with Dennis. ( see separate process)

5
Step 5 of 25
<p>Shut off all field supply/return valves and all valves relating to the boilers and general system except for boiler 13 valves and buffer valves.</p>

Shut off all field supply/return valves and all valves relating to the boilers and general system except for boiler 13 valves and buffer valves.

6
Step 6 of 25
<p>Create venting at the top of the buffer tanks. Utilize scaffold and heavy duty boom lift for access.</p>
<p>Presscon valve is preferred but subject to advice.</p>

Create venting at the top of the buffer tanks. Utilize scaffold and heavy duty boom lift for access.

Presscon valve is preferred but subject to advice.

7
Step 7 of 25
<p>Cool down shock pump loop on boiler 13 by manually activating circ pump.</p>

Cool down shock pump loop on boiler 13 by manually activating circ pump.

8
Step 8 of 25
<p>Install tapping band with 3&quot; outlet on the shock pump pipe loop. Use a hole saw to cut penetration and promptly close off tap.</p>

Install tapping band with 3" outlet on the shock pump pipe loop. Use a hole saw to cut penetration and promptly close off tap.

9
Step 9 of 25
<p>Remove the non return valves from the fill pipe of buffer 1 and buffer 2.</p>

Remove the non return valves from the fill pipe of buffer 1 and buffer 2.

10
Step 10 of 25
<p>Create safe drainage with layflat hose directly to storm water drainage.</p>

Create safe drainage with layflat hose directly to storm water drainage.

11
Step 11 of 25
<p>Commence draining of buffers and buffer main pipes by opening fill valves and shock pump tapping valve.</p>

Commence draining of buffers and buffer main pipes by opening fill valves and shock pump tapping valve.

12
Step 12 of 25
<p>When the water in buffer 2 lowers to below the hot water pipe tank entry, close the cold pipe valve at the base of buffer 2 and the fill line valve at the base of buffer 2.</p>

When the water in buffer 2 lowers to below the hot water pipe tank entry, close the cold pipe valve at the base of buffer 2 and the fill line valve at the base of buffer 2.

13
Step 13 of 25
<p>Utilize scaffold to fully close off all cold valves from buffer 2.</p>

Utilize scaffold to fully close off all cold valves from buffer 2.

14
Step 14 of 25
<p>If the cold valves for buffer 2 do not hold, buffer 2 then must be drained until the water level is below the height of the 400mm hot and cold pipes within the boiler shed.</p>

If the cold valves for buffer 2 do not hold, buffer 2 then must be drained until the water level is below the height of the 400mm hot and cold pipes within the boiler shed.

15
Step 15 of 25
<p>Drain all remaining hot and cold water from 400mm hot and cold pipework within the boiler shed through the drain line installed on boiler 13 shock pump loop and buffer 1 fill point.</p>

Drain all remaining hot and cold water from 400mm hot and cold pipework within the boiler shed through the drain line installed on boiler 13 shock pump loop and buffer 1 fill point.

16
Step 16 of 25
<p>Continue to drain down buffer 1until the water level in the tank is below the horizontal 400mm pipe run and continue to drain until empty.</p>

Continue to drain down buffer 1until the water level in the tank is below the horizontal 400mm pipe run and continue to drain until empty.

17
Step 17 of 25
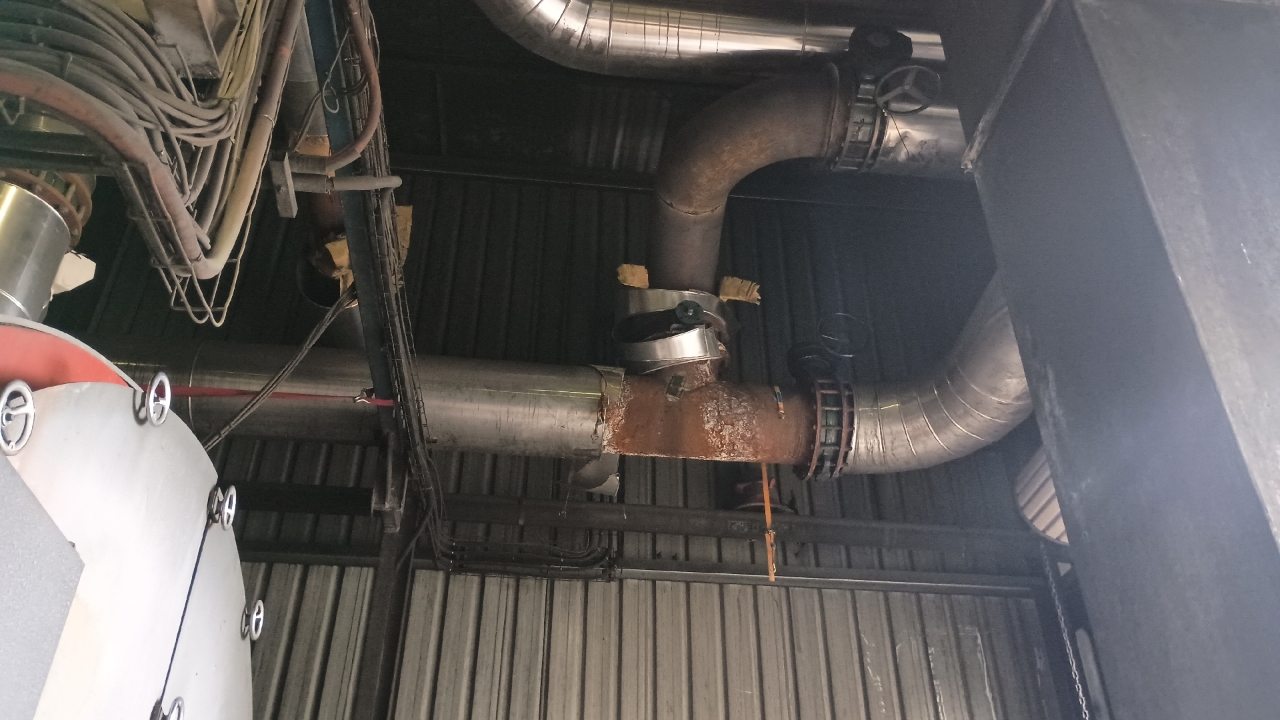
<p>Unbolt flanges surrounding the &quot;T&quot; and wait for the last of the water to drain from the pipe.</p>

Unbolt flanges surrounding the "T" and wait for the last of the water to drain from the pipe.

18
Step 18 of 25
<p>Weld in new piece of pipe and valve flange to be bolted to new &quot;T&quot; piece with extra valve installed on the field side of the &quot;T&quot;.</p>

Weld in new piece of pipe and valve flange to be bolted to new "T" piece with extra valve installed on the field side of the "T".

19
Step 19 of 25
<p>Install pre-constructed &quot;T&quot; piece and bolt in new valves. 4 in total including the new valve on the field side.</p>

Install pre-constructed "T" piece and bolt in new valves. 4 in total including the new valve on the field side.

20
Step 20 of 25
<p>Cut open hot and cold pipes to buffer 1 and install 400mm butterfly valves and flanges. Once installed, close the valves.</p>

Cut open hot and cold pipes to buffer 1 and install 400mm butterfly valves and flanges. Once installed, close the valves.

21
Step 21 of 25
<p>Close off shock pump drain line and connect town water hydrant to the fill point of buffer 2. Commence buffer 2 refill.</p>

Close off shock pump drain line and connect town water hydrant to the fill point of buffer 2. Commence buffer 2 refill.

22
Step 22 of 25
<p>Open all valves that have been closed for the job aside from the two new valves that were installed on Buffer 1 400mm hot and cold pipes.</p>

Open all valves that have been closed for the job aside from the two new valves that were installed on Buffer 1 400mm hot and cold pipes.

23
Step 23 of 25
<p>Use the systems ARV's to bleed air from the reticulated loop while re-filling buffer 2.</p>

Use the systems ARV's to bleed air from the reticulated loop while re-filling buffer 2.

24
Step 24 of 25
<p>Utilize the presscon unit to understand where the water level is for buffer 2 and close off filling once all air is removed from the system and the tank is at the correct level for operation.</p>

Utilize the presscon unit to understand where the water level is for buffer 2 and close off filling once all air is removed from the system and the tank is at the correct level for operation.

25
Step 25 of 25
<p>Carefully resume autonomous operation with buffer 1 seperated from the reticulated system.</p>
<p>FIRST SECTION COMPLETE!!</p>

Carefully resume autonomous operation with buffer 1 seperated from the reticulated system.

FIRST SECTION COMPLETE!!