


Contents (Click to view)
Contents (Click to view)

Components List


Tools List
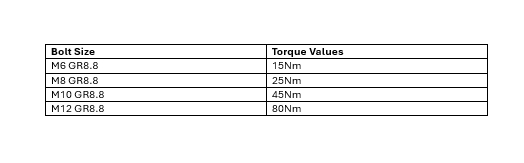
Torque Values
Fit an M8 x 25 hex head bolt through the third hole from the arrow, with an M8 spring washer and M8 flat washer under the bolt head. Screw it into the channel nut.
Fit the low-profile bar onto the channel nuts, then tighten the bolts.
Lift the drawer unit into the ute tray. Take care not to scratch or dent the tray sides, tailgate or paintwork.

Measure each side to centre the rear.

Measure each side to centre the front.
![<p>Using the inside mounting hole on each side of the drawer unit as a guide, drill through the tray floor with a [8.5] mm drill bit.</p>](https://knowby.show/media/33993c78-fa9c-4df1-b8ca-acdec30ae2c8/knowbys/30d1c62a-0b98-43dc-873e-0861a4fe76c5/steps/e1f067c4-3ebb-49b0-a853-af63e1688be5/dd100958-99fa-43aa-a587-6304725493f7-web.jpg)
Using the inside mounting hole on each side of the drawer unit as a guide, drill through the tray floor with a [8.5] mm drill bit.
Drill through, ensure there is nothing below to hit.
Ensure to clean up the swarf after drilling
Use soft seal over the hole drilled.
Tighten using:
2x M8x40 Hex HD Bolts
2x Flat Washers (for on top)
2x Penny Washers (for the bottom)
2x Nylocs
Drill through, ensure there is nothing below to hit.
Ensure to clean up the swarf after drilling.
Use soft seal over the hole drilled.
Tighten using:
2x M8x40 Hex HD Bolts
2x Flat Washers (for on top)
2x Penny Washers (for the bottom)
2x Nylocs

Please fill out the hard copy QA sheet included with the product you got.
Once filled out, please send it back to
If the hard copy does not arrive, please contact us.
0800 663 500