


Contents (Click to view)
(Click to view)

Contents List

Contents List

Contents List

Contents List

Contents List

Contents List

Tools List

Tools List

Torque Values

Ensure you remove the negative terminal from the battery before starting

Apply the rubber foam across the front, over the wellside.
Ensure to use tape prep

Urethane the front corners of the wellside.

Install the front bracket onto the wellside in the position shown.

Fit the rear bracket as shown
Coat the edges of the fitting kit side rails with tape primer and let it dry.
Apply the small D-type rubber as shown.
Countersink the end holes for the front rail on the wellside.

Make sure the bolt fits neatly once the hole is countersunk.
Position the front rail on the front of the wellside, leaving it loosely fitted.
Fit side rails loosely
Place M6 x 25 CSK cap screws into the holes shown on both sides.
Use M6 Nyloc nuts to tighten the fitting kit to the brackets on the wellside.
Tighten the fitting kit to the wellside.

Detailed drawing for the next step.
Install the centre clamp in the position shown in the drawing above.
Urethane the front corners of the fitting kit
Fit foam rubber to the bottom of the canopy.
Ensure to use tape primer

Bolt Placement Diagram
Pull the cab-to-canopy loom down from the wellside, then punch a hole through the grommet underneath as shown.
As shown, locate the yellow wire and the brown wire.
Solder the brown wire from the in-cab loom to the yellow wire.
Solder the wires.
Solder the brown wire from the vehicle plug to the green wire on the in-cab loom.
Use electrical tape to cover it up.
Open up the wire shown. Find the light green wire
Connect the light green wire to the T-join on the in-cab loom.
Pull the blue fuse blade out as shown
Attach the fuse blade holder to the wiring loom, install two 15-amp fuses into the holder, and refit it into the original slot.

Fuse blade in the slot.
Fit the earth to the spot shown.
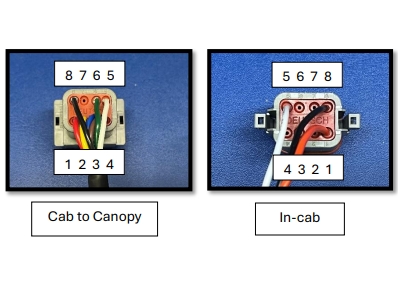
Connect the looms. Plug the canopy loom to the cab to the canopy loom. Make sure the wires and loom are hidden neatly and tidily.

Remove this screw from each of the 6 latches

Please fill out the hard copy QA sheet included with the product you got.
Once filled out, please send it back to
If the hard copy does not arrive, please contact us.
0800 663 500