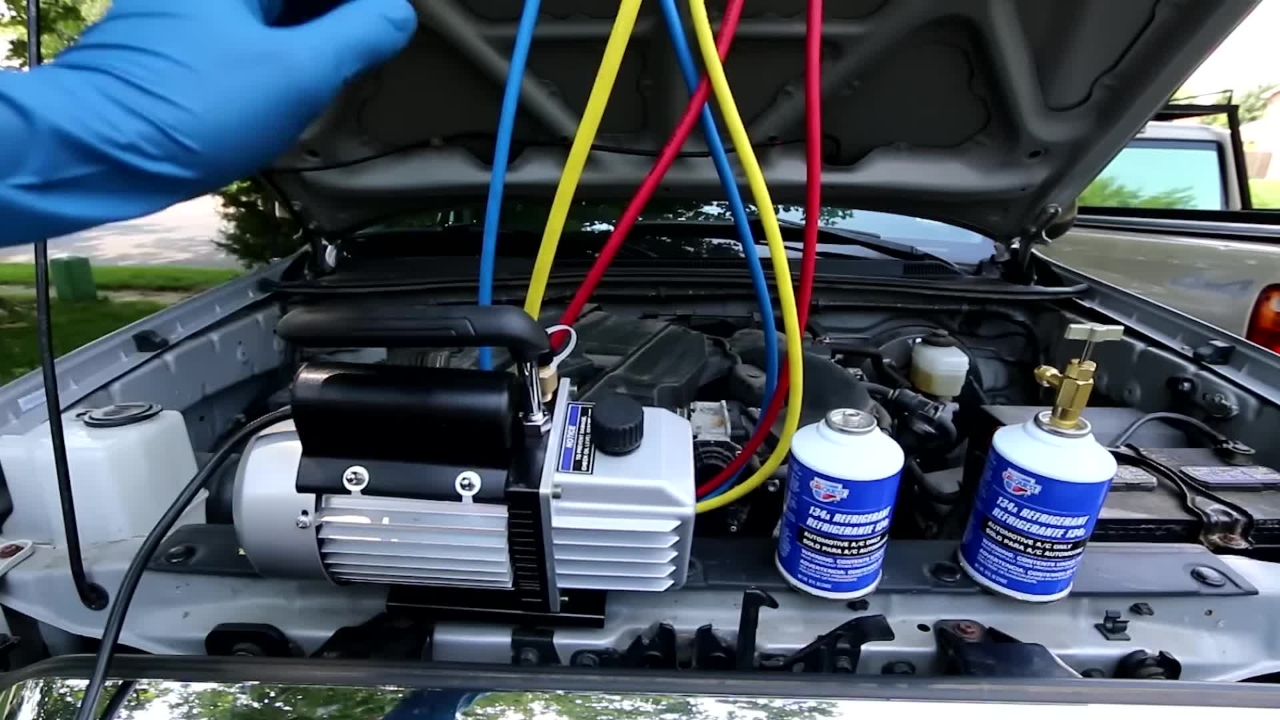
Here are the tools you're going to need to do a proper AC system recharge.
A set of manifold gauges, which tell you the pressure of the AC system.
A vacuum pump, to pull a vacuum on the AC system.
Note: In this example, there is no refrigerant in the system as the compressor was just replaced.
If there is any refrigerant in your system, you will need to get the system professionally evacuated - be environmentally responsible.
Additionally you'll need:
A nozzle to tap the refrigerant.
In some cases, you might need a digital scale to measure how much refrigerant you're putting in.
Any time you're working on an air conditioning system, make sure you use gloves and safety glasses.
In case refrigerant leaks out, you don't want it to cause frostbite and you don't want it to blind you.
Before you purchase refrigerant, you need to know how much refrigerant you need and what kind of refrigerant to purchase.
To figure that out, there's a sticker located on your car. Usually the sticker is found right in the front on this piece of metal right here, or the plastic trim that covers the metal.
The other place you could find it is up on the bonnet somewhere. You can see there's two stickers there and there.
In this case, we have it right here. And you can see on this sticker, it says we're using HFC134A, which is the same thing as R134A, which is the most common in today's cars.
On the sticker it says we're going to have to add anywhere between 570g (1.26 LBS) and 630g (1.39 LBS) of refrigerant.
Verify the weight of the refrigerant you purchased. If you need less than one can of refrigerant you will need to weigh it out as it goes into the system.
Typically you will need more than one can of refrigerant, and less than two cans so you only need to weigh out the difference on the second can.
The first thing you will need to do is to pull a vacuum on the whole AC system.
This draws out any air and moisture that's in the AC lines, the evaporator, the condenser, and the compressor.
Moisture will destroy AC systems. So this is a very, very important step.
Note: If you skip this step, you're pretty much wasting your time, since the moisture is just going to cause a leak in the future.
Connect the manifold gauge to the AC system.
You want to make sure that all these valves are in the closed position.
The left side is the low pressure side of the gauge.
This right side is the high pressure side of the gauge.
The middle is where you're going to pull a vacuum and then add the refrigerant in later on.
The low pressure connector only fits on the low pressure side, and the high pressure connector only fits on the high pressure side.
They're two different sizes, so you can't mix them up.
Connect the blue low pressure line, to the low pressure port. Ensure the valve is closed off.
Connect the red high pressure line, to the high pressure port. Ensure the valve is closed off.
Back at the gauges, ensure both valves are closed off.
Again, at the end of the hoses, open the low pressure valve, then open the high pressure valve.
Back at the gauges, in this example, there is no pressure in the system compressor was just replaced.
You can see the low pressure side (blue) is at 0, which is exactly what we expect.
And the high pressure side (red) is also at 0, which is what we also expect.
Before you can start pulling a vacuum, you will need to connect the yellow line to the vacuum pump.
Connect the line to the vacuum pump, don't tighten more than hand-tight.
Once everything is connected verify:
The valves at the manifold gauges are in the off position.
The valve connected to the end of the low pressure (blue) line is open.
The valve connected to the end of the high pressure (red) line is open.
The yellow vacuum line is connected securely to the vacuum pump.
Turn on the pump.
Proceed to open the valves on the manifold, you should see the needles drop down below 0 as the vacuum is pulled.
After letting the vacuum run for a few minutes, the blue gauge should get down to minus 30 of vacuum.
At that point, close the valves on the manifold, then turn off the vacuum pump.
Leave to sit for about 1 hour to ensure that there are no leaks and the AC system maintains the vacuum.
After 1 hour verify that the gauge reading is identical, ensuring no leaks are in the system.
Now turn on the vacuum pump again, open up both of the manifold valves again, and continue to pull a vacuum for a further 45 minutes.
This is to evacuate all the moisture and air out of the system.
After 45 minutes, verify that the blue gauge on the manifold still reads minus 30.
Then close both manifold valves, and shut down the vacuum pump.
The next thing we do is add the refrigerant. If you replaced a major component in the AC system, such as the air conditioning compressor, the condenser, or the evaporator, you're going to have to add oil to your system.
The next thing we do is add the refrigerant.
Disconnect the yellow hose from the vacuum pump and connect the refrigerant bottle.
I already have it in there. So now we're going to go connect our refrigerant to this line.
So the first thing we'll do is connect our adapter right to the refrigerant can, make sure it's a nice tight seal.
Then connect our refrigerant can to our yellow line.
Then screw down the adapter, which will pierce the can.
When the adapter is screwed down it is in the closed position, so no refrigerant can come out.
So now we're going to open up our can so we can purge the system.
With the adapter on the can in the open position, there's some refrigerant in this line, but there's also air in this line that will need to be purged out.
To purge the line of air, push the tip of a screwdriver into the purge valve until refrigerant comes out, ensuring there is no air left in the hose.
Start the engine of the vehicle, and make sure the air conditioner is on and the fan is set to low.
Ensure the AC is running so the compressor will run and draw in the refrigerant.
Open up only the low pressure valve (blue) on the manifold.
Wait for the compressor engage.
Once it engages you will see the low pressure side drop, while the high pressure side is slowly building up pressure.
Wait for the compressor to suck out the refrigerant from the can. When you think the can is empty, turn it over and give it a shake.
You can check the glass window to see if any refrigerant comes out. If you see refrigerant pass through, wait a minute or two and then check it again.
Once you are certain the can is empty, turn off the blue low pressure valve before you disconnect the can.
Next, close the valve on the can adapter to seal off the yellow hose.
Twist the new can on.
You will need to weigh the can, because you will likely not require the entire contents of the can.
Calculate the remaining amount to be used; the system capacity minus weight of first can will give you the amount you need from the second can.
Open the valve on the can adapter while it is resting on the scale on the scale.
Gently open the blue low pressure valve on the manifold to allow refrigerant to get sucked in slowly.
Monitor the scale to ensure you don't go below the required weight for the system capacity.
When you are at the required weight, close the blue low pressure valve on the manifold.
To remove the manifold gauge, ensure that both the high and low pressure valves on the manifold gauge are still in the closed position.
Close the valve on the end of the red high pressure hose, then pop the connection off.
Then, close the valve on the end of the blue low pressure hose, then pop the connection off.
Make sure to screw back any caps on the AC system to protect the valves.
Done - the AC has now been recharged with refrigerant.