
Knowby
Wiring, Next-Gen Ranger for Sequential LEDs
This harness required for the “355” and “385” series LED tail lights. Everything with this harness is “plug and play” except for one wire. See instructions below.
1
Step 1 of 10
<p>Make sure you have the harness the right way. The bare red wire needs to be on the PASSENGER side.</p>

Make sure you have the harness the right way. The bare red wire needs to be on the PASSENGER side.

2
Step 2 of 10
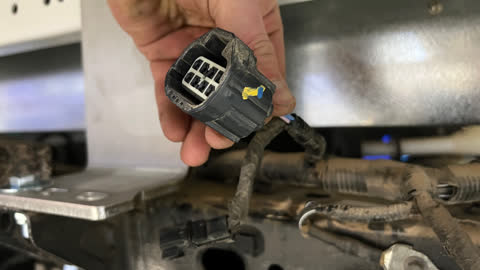
<p>On the vehicle, passenger side, Identify this plug. It originally went to the 12v outlet in the Tub</p>

On the vehicle, passenger side, Identify this plug. It originally went to the 12v outlet in the Tub

3
Step 3 of 10
<p>Identify the bare red wire on the supplied wiring harness</p>

Identify the bare red wire on the supplied wiring harness

4
Step 4 of 10

IMPORTANT: there are 2 versions of this plug. Follow the next steps closely

5
Step 5 of 10
<p>IF the plug has only 2 wires it will look like this</p>
<p>Trim the plug off.
Trim the blue wire back so it is short. It is not used. You will use the pinky/grey coloured wire</p>

IF the plug has only 2 wires it will look like this

Trim the plug off. Trim the blue wire back so it is short. It is not used. You will use the pinky/grey coloured wire

6
Step 6 of 10
<p>Connect it as shown. Solder and insulate thr wire</p>

Connect it as shown. Solder and insulate thr wire

7
Step 7 of 10
<p>If the plug has 4 wires, it will look like this . We use the pinky/grey wire. (This vehicle was a WildTrak)</p>
<p>Connect it to the red wire on supplied harness. It will look like this.</p>

If the plug has 4 wires, it will look like this . We use the pinky/grey wire. (This vehicle was a WildTrak)

Connect it to the red wire on supplied harness. It will look like this.

8
Step 8 of 10
<p>Solder the connection. Wrap it with insulation tape</p>

Solder the connection. Wrap it with insulation tape

9
Step 9 of 10
<p>On passenger side. Plugs into revering sensor harness</p>

On passenger side. Plugs into revering sensor harness

10
Step 10 of 10
<p>All other connections are
“Plug and play” and where they connect will be obvious.</p>
<p>Test that lights work correctly. Neatly zip tie wiring.</p>

All other connections are “Plug and play” and where they connect will be obvious.

Test that lights work correctly. Neatly zip tie wiring.