Knowby
DRAWERS, RENAULT
1
Step 1 of 17
2
Step 2 of 17

Contents (Click to view)

STEP 3: Components List

STEP 7: Tools List

STEP 8: Torque Values

STEP 9: Rear Drawer Fitting

STEP 14: Side Split Drawer Fitting

STEP 17: QA Sheet

3
Step 3 of 17
4
Step 4 of 17
5
Step 5 of 17
6
Step 6 of 17
7
Step 7 of 17
<p>Tools List</p>

Tools List

8
Step 8 of 17
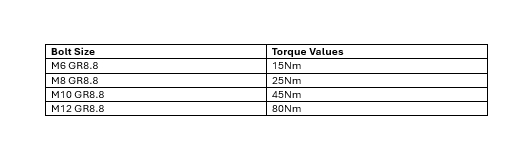
<p>Torque Values</p>

Torque Values

9
Step 9 of 17
<p>When installing the drawer pull it to the rear of the van just in front of these plastic tabs as shown.</p>

When installing the drawer pull it to the rear of the van just in front of these plastic tabs as shown.

10
Step 10 of 17
<p>Ensure the drawer is square</p>

Ensure the drawer is square

11
Step 11 of 17
<p>Place a 4.5mm packer underneath the front of the drawer.</p>

Place a 4.5mm packer underneath the front of the drawer.

12
Step 12 of 17
<p>Fit the low-profile bar to the drawer (<strong><em>BLUE ARROW</em></strong>) using a channel nut. Ensure the low profile is the same length on each side.</p><p>Drill through the low-profile bar and through the van 100mm from side of drawer.</p>

Fit the low-profile bar to the drawer (BLUE ARROW) using a channel nut. Ensure the low profile is the same length on each side.

Drill through the low-profile bar and through the van 100mm from side of drawer.
13
Step 13 of 17
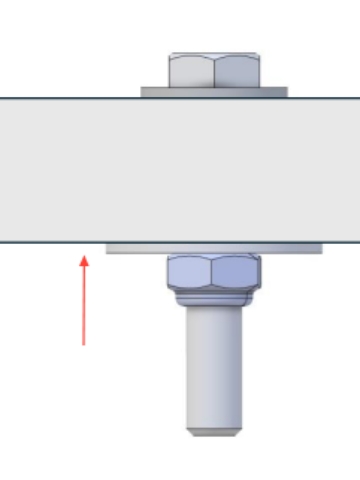
<p>To fit the drawer to the floor, use an M8 x&nbsp;40mm hex head bolt with an M8 flat head washer on top and below with an M8 nyloc nut to tighten.</p>

To fit the drawer to the floor, use an M8 x 40mm hex head bolt with an M8 flat head washer on top and below with an M8 nyloc nut to tighten.

14
Step 14 of 17
15
Step 15 of 17
<p>Fit the split drawer to the van floor, the same as the last two steps from the single drawer above. The M8 bolt will be 45mm from the drawer side.</p><p></p><p></p><p></p>

Fit the split drawer to the van floor, the same as the last two steps from the single drawer above. The M8 bolt will be 45mm from the drawer side.

16
Step 16 of 17
<p>Ensure the split drawer is square.</p>

Ensure the split drawer is square.

17
Step 17 of 17
<p>Please fill out the hard copy QA sheet included with the product you got.</p><p>Once filled out, please send it back to</p><p><a target="_blank" rel="noopener noreferrer nofollow" href="mailto:charl@camcoindustries.co.nz">charl@camcoindustries.co.nz</a></p><p>If you have issues with instructions and need assistance, please contact.</p><p><a target="_blank" rel="noopener noreferrer nofollow" href="mailto:roman@camcoindustries.co.nz">roman@camcoindustries.co.nz</a></p><p>+64 21 349 001</p><p>&nbsp;</p><p>If the hard copy does not arrive, please contact us.</p><p><a target="_blank" rel="noopener noreferrer nofollow" href="mailto:charl@camcoindustries.co.nz">charl@camcoindustries.co.nz</a></p><p>0800 663 500</p>

Please fill out the hard copy QA sheet included with the product you got.

Once filled out, please send it back to

charl@camcoindustries.co.nz

If you have issues with instructions and need assistance, please contact.

roman@camcoindustries.co.nz

+64 21 349 001


If the hard copy does not arrive, please contact us.

charl@camcoindustries.co.nz

0800 663 500