
Knowby
TC - Generic Wiring Standard
E0102, E0104.
E0102, E0104.
1
Step 1 of 21
<p>Before starting work under the bonnet, use a fender cover to prevent damage to the cab.</p>

Before starting work under the bonnet, use a fender cover to prevent damage to the cab.

2
Step 2 of 21
<p>Disconnect negative battery terminal before starting any wiring on a vehicle.</p><p>This also needs to be done if any welding is being completed on a vehicle or product installed to the vehicle.&nbsp;</p><blockquote><p><strong>CQC: Confirm battery terminal is isolated, use a rag if needed.</strong></p></blockquote><p></p>

Disconnect negative battery terminal before starting any wiring on a vehicle.

This also needs to be done if any welding is being completed on a vehicle or product installed to the vehicle. 

CQC: Confirm battery terminal is isolated, use a rag if needed.

3
Step 3 of 21
<p>Verify and use correct AWG/amp rating to match application.</p>

Verify and use correct AWG/amp rating to match application.

4
Step 4 of 21
<p>Protect circuits with standard fuse holders or fuse taps.</p><blockquote><p><strong>CQC: Fuse rating 25-30% above constant load.</strong></p></blockquote><p></p>

Protect circuits with standard fuse holders or fuse taps.

CQC: Fuse rating 25-30% above constant load.

5
Step 5 of 21
<p>When installing crimp terminals, strip insulation 10mm without damaging conductor strands.</p>

When installing crimp terminals, strip insulation 10mm without damaging conductor strands.

6
Step 6 of 21
<blockquote><p><strong>CQC: Insulation not inside crimp area, end of terminal not crimped.</strong></p></blockquote><p></p>

CQC: Insulation not inside crimp area, end of terminal not crimped.

7
Step 7 of 21
<p>If needing to join 2 wires together, use solder sticks to match correct wire gauge.</p><blockquote><p><strong>CQC: Do not use solder and insulation tape as this does not guarantee a safe, insulated join.</strong></p></blockquote><p></p>

If needing to join 2 wires together, use solder sticks to match correct wire gauge.

CQC: Do not use solder and insulation tape as this does not guarantee a safe, insulated join.

8
Step 8 of 21
<p></p>

9
Step 9 of 21
<blockquote><p><strong>CQC:</strong> Avoid using cable ties to secure any splice points</p></blockquote><p></p>

CQC: Avoid using cable ties to secure any splice points

10
Step 10 of 21
<p>Where possible, avoid in-cab splicing through the use of Fuse Tap's via Accessory power feed points</p><blockquote><p><strong>CQC: </strong>Use accessory standard feed that does not share a critical system eg ABS/ECU etc</p></blockquote><p></p>

Where possible, avoid in-cab splicing through the use of Fuse Tap's via Accessory power feed points

CQC: Use accessory standard feed that does not share a critical system eg ABS/ECU etc

11
Step 11 of 21

If using deutsch connectors, refer to the following Knowby:

TC - How to use Deutsch Connectors

12
Step 12 of 21
<p>Cover exposed runs with braided or split corrugated sleeving.</p>

Cover exposed runs with braided or split corrugated sleeving.

13
Step 13 of 21
<p>Follow factory looms where possible, securing at least every 300mm using cable ties.</p><blockquote><p><strong>CQC:</strong> Ensure wiring is routed away from the exhaust system, fuel lines, and other hot, moving or sharp surfaces.</p></blockquote><p></p><p></p>

Follow factory looms where possible, securing at least every 300mm using cable ties.

CQC: Ensure wiring is routed away from the exhaust system, fuel lines, and other hot, moving or sharp surfaces.

14
Step 14 of 21
<p>Pass through OEM grommets where available.</p><blockquote><p><strong>CQC: </strong>No sharp metal edges on penetrations, seal penetrations with silicone.</p></blockquote><p></p>

Pass through OEM grommets where available.

CQC: No sharp metal edges on penetrations, seal penetrations with silicone.
15
Step 15 of 21
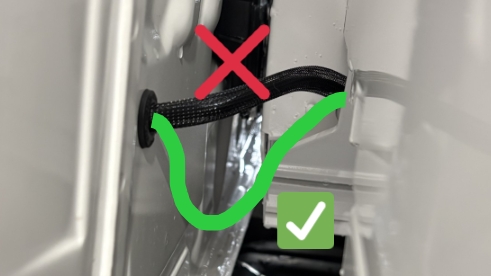
<p>Ensure any in-cab penetrations have a 'drip-loop' so water does not run down cabling</p>

Ensure any in-cab penetrations have a 'drip-loop' so water does not run down cabling

16
Step 16 of 21
<p>Avoid tight bends.</p>

Avoid tight bends.

17
Step 17 of 21
<p>Use patch looms instead of splicing OEM harnesses.</p><blockquote><p><strong>E.g. FRC2 central locking + power feed patch harness (UM-RANG-CH02, 80606-36).</strong></p></blockquote><p></p>

Use patch looms instead of splicing OEM harnesses.

E.g. FRC2 central locking + power feed patch harness (UM-RANG-CH02, 80606-36).

18
Step 18 of 21
<p>Use factory earth points.</p><blockquote><p><strong>CQC: </strong>Avoid cleaning the chassis to bare metal.</p></blockquote><p></p>

Use factory earth points.

CQC: Avoid cleaning the chassis to bare metal.

19
Step 19 of 21
<blockquote><p><strong>CQC:</strong> Check wiring is not caught on any interior kick panels or trim so to not be damaged on return</p></blockquote><p></p>

CQC: Check wiring is not caught on any interior kick panels or trim so to not be damaged on return

20
Step 20 of 21
<blockquote><p><strong>CQC:</strong> </p><ul><li><p>Inspect all panels, confirm these are all clipped correctly back in place.</p></li><li><p>Confirm there are no loose wires or items that will be impede or interfere with the vehicle or operator while driving.</p></li></ul></blockquote><p></p>

CQC:

  • Inspect all panels, confirm these are all clipped correctly back in place.

  • Confirm there are no loose wires or items that will be impede or interfere with the vehicle or operator while driving.

21
Step 21 of 21
<p>Label the function of each wire/pin near deutsch plugs or any in-house made loom.</p>

Label the function of each wire/pin near deutsch plugs or any in-house made loom.