Knowby Heg Automotive Pty Ltd
Knowby
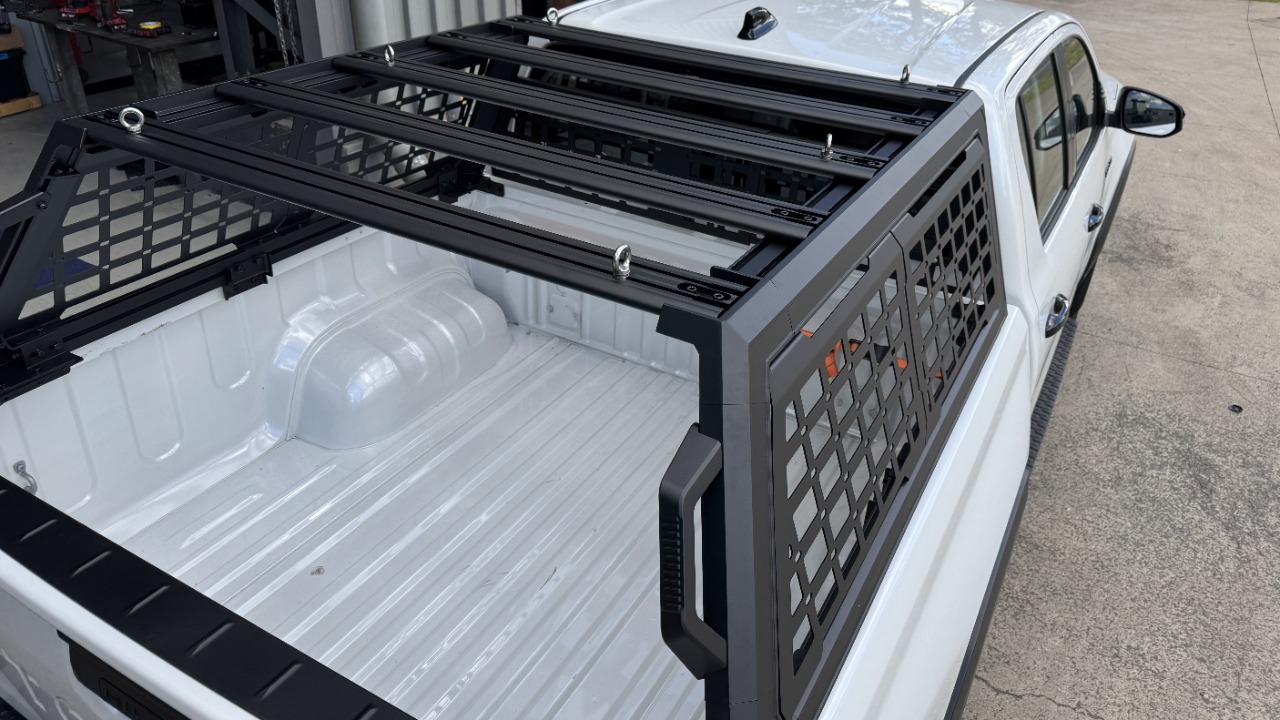
Mayka Tub Rack installation - Mitusubishi MV Triton
Follow these instructions to install your Mayka Tub Rack to your Mistubishi MV Triton
1
Step 1 of 23
Drag to rotate

Mistubishi MV Triton Tub Rack

Click "Open Document" to view 3D Model

Brackets and fitted components have been colour coded per legend below:

ORANGE: Front Brackets

RED: Middle Brackets

Green: Rear Brackets

White: Crossbars

Yellow: Tie Down Eyelets

Grey: Front Window Mesh (Optional Add-on)

Please note: We have provided this for reference in the assembly process

2
Step 2 of 23
<p>Gather the tool required for the installation</p><ul><li><p>3-4mm Drill bit </p></li><li><p>8.5mm Drill bit</p></li><li><p>Deburring tool</p></li><li><p>Rust Proof Pain and applicator. </p></li></ul><p></p>

Gather the tool required for the installation

  • 3-4mm Drill bit

  • 8.5mm Drill bit

  • Deburring tool

  • Rust Proof Pain and applicator.

3
Step 3 of 23
<p>You will also require the tools used in the assembly of the tub rack. </p><ul><li><p>Masking Tape</p></li><li><p>6mm Hex key</p></li><li><p>13mm spanner or socket</p></li><li><p>Marker Pen</p></li></ul><p></p>

You will also require the tools used in the assembly of the tub rack.

  • Masking Tape

  • 6mm Hex key

  • 13mm spanner or socket

  • Marker Pen

4
Step 4 of 23
<h3><strong><em>Please note: GLX models or any tub with a headboard will require the cutting and removal of the headboard to install the MAYKA Tub Rack.</em></strong></h3><p></p>

Please note: GLX models or any tub with a headboard will require the cutting and removal of the headboard to install the MAYKA Tub Rack.

5
Step 5 of 23
<p>Before marking holes on the tub, place tape where required to mark any holes for drilling.</p><p>NOTE: The middle bracket does not require specific placement, but we do recommend installing it once the tub rack is place and spacing it evenly between both the front and rear brackets.</p><p></p>

Before marking holes on the tub, place tape where required to mark any holes for drilling.

NOTE: The middle bracket does not require specific placement, but we do recommend installing it once the tub rack is place and spacing it evenly between both the front and rear brackets.

6
Step 6 of 23
<p>Fit the front brackets in place using M10x25mm Heax head Bolts with a M10 Spring washer and flat washer.</p><p>The two circled bolts at the front will need a M10 Flange nut fitted too - The two on the side retain using the OEM weld nuts.</p><p>Keep all bolts finger tight to allow for later adjustment.</p>

Fit the front brackets in place using M10x25mm Heax head Bolts with a M10 Spring washer and flat washer.

The two circled bolts at the front will need a M10 Flange nut fitted too - The two on the side retain using the OEM weld nuts.

Keep all bolts finger tight to allow for later adjustment.

7
Step 7 of 23
<p>Fit the rear bracket in place with an M10x25mm bolt into the existing weld nut. </p><p></p>

Fit the rear bracket in place with an M10x25mm bolt into the existing weld nut.

8
Step 8 of 23
<p>Alignt the top of the bracket to be flush with the tub - Then mark the slotted hole for drilling. </p>

Alignt the top of the bracket to be flush with the tub - Then mark the slotted hole for drilling.

9
Step 9 of 23
<p>Using a 4mm drill bit - Drill a pilot hole where marked.  </p>

Using a 4mm drill bit - Drill a pilot hole where marked.

10
Step 10 of 23
<p>Using an 8.5mm drill bit - Drill the pilot hole out again. </p>

Using an 8.5mm drill bit - Drill the pilot hole out again.

11
Step 11 of 23

Debur all drilled holes.

12
Step 12 of 23

Apply rust proof paint to drilled holes.

13
Step 13 of 23
<p>Fit an M8x25mm Hex Head Bolt with a spring washer, flat washer and a flanged hex nut. </p><p>Leave all bolts finger tight for later adjustment. </p>

Fit an M8x25mm Hex Head Bolt with a spring washer, flat washer and a flanged hex nut.

Leave all bolts finger tight for later adjustment.

14
Step 14 of 23
<p>Place the assembled tub rack on to the tub.</p>

Place the assembled tub rack on to the tub.

15
Step 15 of 23
<p>Align the slotted holes on the bracket and tub rack corners to the fitted brackets then loosely fix M8x30mm Hex Bolts with M8 spring and flat washers and M8 Flanged Hex Bolts.</p><p>Follow this step for all four corners.</p>

Align the slotted holes on the bracket and tub rack corners to the fitted brackets then loosely fix M8x30mm Hex Bolts with M8 spring and flat washers and M8 Flanged Hex Bolts.

Follow this step for all four corners.

16
Step 16 of 23

Fit two spring nuts into the channel along each inside channel of the bottom extrusions.

17
Step 17 of 23

Using two M8x16mm Hex Bolts with spring washers and flat washers - secure the two remaining brackets to the spring nuts in the channel.

Place marking tape in the middle of the panel and mark the two holes when aligned. Repeat steps 9-12.

18
Step 18 of 23
<p>Loosely fix M8x16mm Hex Bolts with M8 spring and flat washers and M8 Flanged Hex Bolts.</p><p>Repeat on both so sides. </p>

Loosely fix M8x16mm Hex Bolts with M8 spring and flat washers and M8 Flanged Hex Bolts.

Repeat on both so sides.

19
Step 19 of 23
<p>Before tightening all bolts, ensure your tub rack is evenly aligned on both sides of the vehicle. </p>

Before tightening all bolts, ensure your tub rack is evenly aligned on both sides of the vehicle.

20
Step 20 of 23

Once aligned, tighten all corner bracket nuts and bolts to secure the tub rack.

21
Step 21 of 23
<p>Make sure all crossbars are spaced evenly and centrally or as required. </p>

Make sure all crossbars are spaced evenly and centrally or as required.

22
Step 22 of 23

Tighten all crossbar bolts once spaced correctly.

23
Step 23 of 23
<p>The tub rack is now installed.</p>

The tub rack is now installed.