Knowby
CANOPY, KIA TASMAN
1
Step 1 of 45
2
Step 2 of 45

Contents (Click to view)

STEP 4: Components List

STEP 11: Tools List

STEP 13: Torque Values

Step 14: Battery

STEP 15: Fitting Kit Installation

STEP 27: Canopy Installation

3
Step 3 of 45

Contents (Click to view)

STEP 33: Tailgate Fitting Kit

STEP 35: Cab to Canopy Loom

STEP 39: Door Ajar Alarm/Central Locking

STEP 42: Fuse/Earth

STEP 44: Checkover

STEP 45: QA Sheet

4
Step 4 of 45
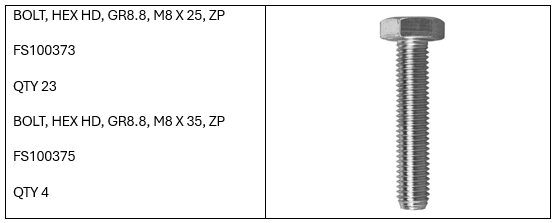
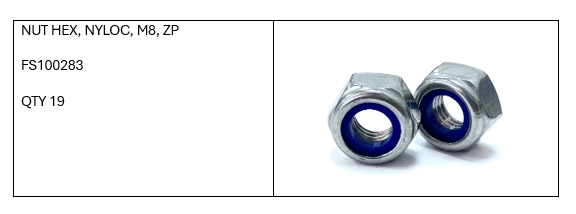
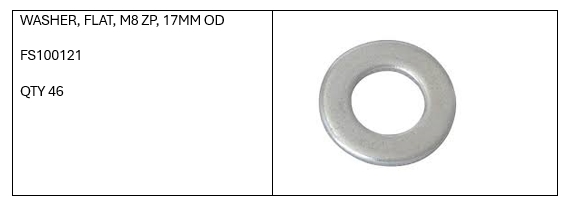
<p>Components List</p>

Components List

5
Step 5 of 45
<p>Components List</p>

Components List

6
Step 6 of 45
<p>Components List</p>

Components List

7
Step 7 of 45
<p>Components List</p>

Components List

8
Step 8 of 45
<p>Components List</p>

Components List

9
Step 9 of 45
<p>Components List</p>

Components List

10
Step 10 of 45
<p>Components List</p>

Components List

11
Step 11 of 45
<p>Tools List</p>

Tools List

12
Step 12 of 45
<p>Tools List</p>

Tools List

13
Step 13 of 45
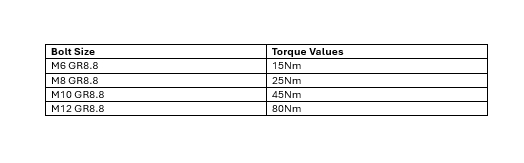
<p>Torque Values</p>

Torque Values

14
Step 14 of 45
<p>Remove the negative battery terminal.</p>

Remove the negative battery terminal.

15
Step 15 of 45

Fit 19x9mm foam tape (RS102633) to the front of the wellside. Ensure to tape prep beforehand.

16
Step 16 of 45
<p>Urethane the corners of the front of the wellside.</p>

Urethane the corners of the front of the wellside.

17
Step 17 of 45
<p>Remove the front tie-down points and install the front bracket (CP111187/88), and reinstall the tie-down point with it.</p>

Remove the front tie-down points and install the front bracket (CP111187/88), and reinstall the tie-down point with it.

18
Step 18 of 45
<p>Fit the rear bracket (CP111189/90. Ensure to use the spacer behind where it is mounted. Fit using:</p><p>M8x35 Hex HD Bolt, x4</p><p>M8 Washer Flat, x4</p>

Fit the rear bracket (CP111189/90. Ensure to use the spacer behind where it is mounted. Fit using:

M8x35 Hex HD Bolt, x4

M8 Washer Flat, x4

19
Step 19 of 45

Fit the front crossmember (CP111186) to the front of the wellside.

20
Step 20 of 45

Mount the front crossmeber to the front bracket using:

M8x25 Bolt HEX HD, x6

M8 Washer Flat, x12

M8 Nyloc, x6

21
Step 21 of 45

Tighten the crossmember to the bracket.

22
Step 22 of 45

Fit D-Type rubber seal (RS101034) to the side rails (CP111183/84). Ensure to use tape prep.

23
Step 23 of 45

Fit the siderails to each side of the wellside.

24
Step 24 of 45

Fit the siderail to the rear upright using:

M8x25 Hex HD Bolts, x4

M8 Washer Flat, x8

M8 Nyloc, x4

25
Step 25 of 45

Tighten all bolts.

26
Step 26 of 45

Urethane the front corners of the fitting kit.

27
Step 27 of 45

Fit 40mmX4.8mm foam tape(RS109360) to the bottom of the canopy.

28
Step 28 of 45
<p>Lift the canopy onto the wellside with at least 4 people.</p>

Lift the canopy onto the wellside with at least 4 people.

29
Step 29 of 45
<p>Diagram for bolt holes to use on the canopy.</p>

Diagram for bolt holes to use on the canopy.

30
Step 30 of 45

Place a bolt in the front side holes to line the canopy up.

31
Step 31 of 45

Fit the middle bolt.

32
Step 32 of 45

Fit the rest of the side bolts. and tighten all.

33
Step 33 of 45

Fit the tailgate bracket to the tailgate using the factory bolts.

34
Step 34 of 45

Tighten to the tailgate

35
Step 35 of 45
<p>Route the cab to the canopy loom through the hole and down the front of the wellside. This will be on the driver's side.</p>

Route the cab to the canopy loom through the hole and down the front of the wellside. This will be on the driver's side.

36
Step 36 of 45
<p>Route the loom along the top of the chassis and locate this grommet under the driver's seat. Punch a hole through and put the loom through.</p>

Route the loom along the top of the chassis and locate this grommet under the driver's seat. Punch a hole through and put the loom through.

37
Step 37 of 45
<p>Use this diagram for conecting the cab to canopy loom to the incab loom.</p>

Use this diagram for conecting the cab to canopy loom to the incab loom.

38
Step 38 of 45
<p></p>

39
Step 39 of 45
<p>Connect the white wire from the incab loom to the small orange wire with a white stripe. Ensure to solder and use electrical tape.</p>

Connect the white wire from the incab loom to the small orange wire with a white stripe. Ensure to solder and use electrical tape.

40
Step 40 of 45
<p>Connect the brown wire from the incab loom to the yellow factory wire for the lock on the central locking. Ensure to solder and use electrical tape.</p>

Connect the brown wire from the incab loom to the yellow factory wire for the lock on the central locking. Ensure to solder and use electrical tape.

41
Step 41 of 45
<p>Connect the brown wire from the in-cab loom to the orange factory wire. Ensure to solder and use electrical tape.</p>

Connect the brown wire from the in-cab loom to the orange factory wire. Ensure to solder and use electrical tape.

42
Step 42 of 45
<p>Fit the fuse to the spot shown.</p>

Fit the fuse to the spot shown.

43
Step 43 of 45
<p>Fit the earth to the spot shown.</p><p></p>

Fit the earth to the spot shown.

44
Step 44 of 45
<p>Ensure it tidied back to its orignal form.</p>

Ensure it tidied back to its orignal form.

45
Step 45 of 45
<p>Please fill out the hard copy QA sheet included with the product you got.</p><p>Once filled out, please send it back to</p><p><a target="_blank" rel="noopener noreferrer nofollow" href="mailto:charl@camcoindustries.co.nz">charl@camcoindustries.co.nz</a></p><p>If you have issues with instructions and need assistance, please contact.</p><p><a target="_blank" rel="noopener noreferrer nofollow" href="mailto:roman@camcoindustries.co.nz">roman@camcoindustries.co.nz</a></p><p>+64 21 349 001</p><p>&nbsp;</p><p>If the hard copy does not arrive, please contact us.</p><p><a target="_blank" rel="noopener noreferrer nofollow" href="mailto:charl@camcoindustries.co.nz">charl@camcoindustries.co.nz</a></p><p>0800 663 500</p>

Please fill out the hard copy QA sheet included with the product you got.

Once filled out, please send it back to

charl@camcoindustries.co.nz

If you have issues with instructions and need assistance, please contact.

roman@camcoindustries.co.nz

+64 21 349 001


If the hard copy does not arrive, please contact us.

charl@camcoindustries.co.nz

0800 663 500