

How to Complete This Module
After you’ve reviewed all the slides, click “Mark as Complete” at the top right of the window.
Then, select the Quiz to begin.
1. Introduction
The purpose of this training is to provide all Manufacturing employees and contractors with the essential work safety information guidelines for working on site at Hakka Pty Ltd. Please carefully read it through and take note of the correct responses for safety risks.
At the end of the training you will be required to sign for acknowledging that you have read and understood the work safety requirements for working in the Manufacturing team of Hakka.
Your Roles and Responsibilities
All employees and contractors are expected to contribute to a safe working environment by:
Following all safety instructions and wearing the required PPE.
Taking responsibility for their own safety and staying alert at all times.
Not performing tasks that they are not properly trained for.
Stopping and reporting any unsafe behaviours carried out by others.
At Hakka Pty Ltd, work and people safety is not optional — it is everyone’s responsibility, and it take higher priority than any task. Everyone has a role to play in preventing safety accidents. Speak up, stay aware, and work safely—for yourself and for others.
Machine Operation Safety
General rules
Do not operate any machine unless you have received proper training and are instructed to operate it.
Do not leave any foreign items on the machinery, including tools, paper, pen, nuts and bolts, thermometers etc.
Immediately report any unusual noise, smell, movement, or sign of the machine.
Never turn on or turn off any machine that you are not trained or authorized to operate,except in emergency situations where you can confirm it is safe to do so.
Never turn on or off any machine that someone else is working on or around.
When operating a machine, always keep your eyes on the equipment. Do not look around or become distracted. Put your full attention on the machine you are operating.

General Rules
Do not use railings, machine parts, or any objects not specifically designed for climbing. Ladders and safety steps must be used for all tasks requiring elevation.
All the guidelines for operating, installing, setting up, and cleaning machines as described below are meant for employees who are specifically trained to do each of the task. Untrained personnel should not perform any of the tasks even after receiving this work safety training.
Pre-start Machine Checklist
Operating machinery carries serious risks. To minimize the chance of accidents, you must complete the following checks before starting any machine.
If the answer to any of the questions below is "No", do not start the machine. Instead, report the issue to your team leader or the office and wait for further instructions.
Is the machine changed in any way that you have not been briefed?
(eg. Any change of settings, any modification or repair?)Is the safety guard fully installed and closed without any sign of damage?
Do you know where the emergency stop button is located?
Are there any loose tools, materials, or items left on or inside the machine?
(Tools, screws, or packaging materials can cause damage or injury.)

Bladed machine and Equipment
What type of machine come with blades?
Meat Dicer (9236)
Meat Slicer (9212,9605,9304,9212,etc)
Bowl Cutter (9407,9607,9305,etc)
Vegetable Slicer (9228,9217)
Bladed machine and Equipment
Bladed machines have very sharp, fast-moving blades. They can cause serious cuts, amputations, or even life-threatening injuries if not handled correctly
Installation:
Only trained personnel should install the machine.
Make sure the machine is disconnected from power before installation.
Always Check that all blades and parts are fitted securely and the safety guard is properly installed and secured.
Bladed machine and Equipment
Operation:
Always wear correct PPE (well-fitted dust coat and gloves).
Never use your hands or any body part, or any tool, to reach the blades when the machine is running.
Some slicers are equipped with a conveyor belt to feed or discharge products. Do not touch the conveyor belt while the machine is running.
Use pushers or tools to move meat if needed — not your hands.
Never use metal pushers with bladed machines to prevent the risk of getting caught in the machine and causing serious injury.
If you need to remove a jam or blockage, always switch off the machine and disconnect the power first. Wait until all moving parts, especially blades, have come to a complete stop. Blades may continue to move or spin briefly after the machine is turned off.
For machines equipped with safety covers, the cover may only be opened after the machine is powered off.
Cleaning:
Turn off and unplug the machine before cleaning.
Use cleaning tools and proper PPE - avoid touching blades directly.
Ensure the motor and control panel are properly covered and protected against water during cleaning.

High-Temperature and Steam machine/ equipment
What machines typically involve high heat and steam during operation?
Oil Fryer (7237,7219)
Pasteuriser (7224,7225,1244)
Spiral Oven (7388)
Kettle Cooker (6211,6210)
Steamer (7228,7227,7226,7235)
Steamer Box (In Staff Canteen)
Cooking/Gelling Tank (7205,7206)
Crate Washing Machine (9231)
High-Temperature and Steam machine/ equipment
Why is this machine/equipment dangerous?
They can burn your skin or body (hot surfaces, hot oil, or steam).
Pressure inside tanks can cause explosions if something goes wrong.
Hot oil can catch fire or splash.
Wet floors during cleaning can cause slips and falls.
High-Temperature and Steam machine/ equipment
Installation:
Only trained personnel should install the machine.
Make sure all valves, doors, covers, and lids are closed tightly.
Necessary PPE: gloves, apron/poncho, face shield
Operation:
Be very careful when opening doors or lids – hot steam may rush out.
Always use the handle to open.
Use tools (not hands) to take items out of hot machines/equipment when required.
Keep hands away from hot parts and steam outlets.
If any object gets stuck in a non-operational high temperature area, stop the machine immediately and inform your team leader. Do not attempt to remove it by yourself or with tools.
Cleaning:
Turn off power and waiting until the machine cools down.
Be careful of leftover hot water or oil.
Ensure the motor and control panel are properly protected against water during cleaning.
Electrical Safety
At the Hakka site, there are two types of isolation:
A. Mains Isolation
Refers to isolating power at the electrical distribution panel (power board/circuit breaker panel).
B. Local Isolation
Refers to isolating power at the machine’s wall power switch (power point).
Treat all electrical equipment, cords, and outlets as potential hazards. Report any damaged wires, power plugs or power sockets to the team leaders or office immediately.
Ensure a power plug is fully inserted into the socket and turn it to lock position; never force a plug that doesn't fit.
Electrical Safety
The correct order of plugging a power plug and turn on a machine:
1. Make sure the power switch and the machine are both turned to OFF.
2. Plug in securely and turn the power plug to lock position.
3. Turn the power switch to ON.
4. Now you can turn on the machine when ready.
The correct order of unplugging:
1. Turn off the equipment.
2. Turn the power switch to OFF.
3. Unplug.
Keep power cables off the floor and out of walkways to prevent tripping or damage.
If you notice a burning smell, sparks, flickering, or any abnormal sign from electrical devices:
Stop using it immediately.
Unplug it only if safe to do so.
Report the issue to your supervisor or maintenance team.
Standard Practice for Production Cleaning:
The production equipment listed in the chart on the top must be isolated using local isolation (wall power switch). The wall switch must be:
1.Turned OFF
2.Locked out using an approved lock
After cleaning is completed, report to the Team Leaders or Leading Hands to unlock the machine.
Critical Safety Requirements
Always verify isolation before starting work: Attempt to start the machine (try-start test)
After turning off the power (lock out if required):
Wait until the machine cools down.
Be careful of leftover hot water or oil.
Ensure the motor and control panel are properly protected against water during cleaning.

Machines with Internal Chambers and Moving Part/ Filler
What is a Machine with internal Chambers and Moving Parts?
Tunnel Type Machine (3223,3262)
Fryer, Cooker, Steamer, Pasteurizer (7237,7219,7224,7388 etc)
Vacuum Filler (7242,7256,etc)
Meat Mixer, Meat Dicer, Vegetable dicer, Meat Slicer, Vegetable Dicer, Bowl Cutter (9236,9212,9407 etc.)
Helix, Tam (3260,3204,1272)
Forming Machine, Spiral cooker (7234,6201,6223,7388,6209,etc)
Centrifuge (9237,9221)

Machines with Internal Chambers and Moving Part/ Filler
Machines like spiral freezers, meat mixers, and cooking/mixing tanks those who come with an internal chamber are dangerous because they have:
Internal moving parts, like paddles, fans, or augers can cause cuts, crush injuries, or amputations if a hand or tool is inserted during operation.
Extreme temperatures
Limited visibility, as it’s difficult to see inside, and objects (or hands) may accidentally get too close to the moving parts.
Do not attempt to put your body parts or any tool into the inside of a machine if you are not trained to do so.

Machines with Internal Chambers and Moving Part/ Filler
Installation:
Only trained personnel should install the machine.
Make sure all valves, doors, and lids are closed tightly.
Check that safety sensors are working before using the machine.
Before starting any large machine that has internal space where a person could enter or be present (e.g., spiral freezer), the operator must visually inspect and confirm that no person is inside the machine.

Machines with Internal Chambers and Moving Part/ Filler
Operation:
Never put hands or arms inside the machine while it is running.
Do not use metal tools to scrape or push materials — only non-metallic tools are allowed.
For Certain Machine, If material is stuck or hanging, switch off the machine and disconnect the power. Wait until all moving parts have come to a complete stop before removal.
For the other machine, tell team leaders immediately. Do not reach in. Do not try to fix it yourself.
Do NOT touch or use tools to reach into any part of the machine that you cannot clearly see.
If someone is working inside or inspecting the machine, it is strictly forbidden for anyone else to start the machine.
Cleaning
Wait until the machine has cooled down completely before starting.
Never reach into internal chambers without confirming the machine is powered off and cannot restart.

Many of the machines used by the four teams contain conveyor belts or rollers.
Process
Meat Slicer
Vege Dicer
F&C
Former Machine
Spiral FReezer
Bun Machine
Spiral Oven
Fryer
Packing
Helix/Tam
Fuji
Tape Machine
Carton Sealer
Metal Detector
Noodle
Helix
Tape Machine
Dough sheeter Roller
Dough Mixer
Carton Sealer

Machine with Conveyor Belt/Roller
Machines equipped with conveyors and rollers present significant safety risks, primarily due to pinch points and entanglement hazards. These systems involve moving belts, rotating rollers, and narrow gaps where body parts, clothing, or tools can become caught, pulled in, or crushed.
Common hazard zones include:
Entry/exit points of the conveyor belt
Transition points between rollers and belts/rollers and rollers
Areas underneath or behind the conveyor where moving parts are less visible
Installation:
Only trained personnel should install the machine.
Make sure safety sensors are working before using the machine.
Ensure all guarding and protective covers are properly installed and secured before operating the machine.
Operation:
Never reach into moving conveyor or roller sections for any reason.
Operators must tie back long hair, remove loose clothing or gloves, and wear appropriate PPE at all times.
Always stay alert around pinch points. Never touch the conveyor belt or rollers with your hands, as there is a serious risk of getting pulled in.
Machine with Conveyor Belt/Roller
When cleaning with the conveyor running:
In some cases, the conveyor is kept running during cleaning to allow easy access to the entire belt without getting close to the pinch points. While this method can reduce certain risks, it introduces critical safety concerns if not properly managed.
Only use water hose and nozzles, never reach by hand or equipment to clean any moving parts.
Always maintain a safe distance from all pinch points and roller areas.
Do NOT assume it is safe to touch the equipment while it's running.
Actions to Take When Machine Becomes Jammed – Categorized (English/Chinese)
Actions to Take When Machine Becomes Jammed – Categorized (English/Hindi)
Actions to Take When Machine Becomes Jammed – Categorized (English/Tamil)
Actions to Take When Machine Becomes Jammed – Categorized (English/Malayalam)

Bin lifter
Bin lifters are used to lift and tip heavy bins, and can pose serious safety hazards if not handled properly:
The lifting arms, clamps, and tipping mechanisms can trap or crush fingers, hands, or arms.
If the bin is not properly secured, it may fall during lifting or tipping.
Exceeding the weight limit can lead to equipment failure or sudden drops.
Malfunction or incorrect operation can cause unexpected lifting or tilting.

Bin lifter
During Use – Always Check the Following Before Lifting a Bin:
Spring tension: Ensure the spring for the bin lock still has proper tension.
Latch weld joints: Confirm the bin lock is securely welded and not cracked or damaged.
Audible click: When pushing the bin into the lifter, you should hear a clear “clunk” sound, indicating the bin is securely locked in place.
Confirm the bin weight does not exceed the posted maximum load capacity, which is clearly displayed on the wall near the lifter or on the lifting arm itself.
Bin lifter
Never put your hands near the lifting arms, clamps, or tipping area.
Do not try to reposition or adjust the bin while it is lifting or tipping.
Stay clear of the area while the lifter is operating, never walk under a raised bin.
Never stand on a bin lifter under any circumstances.
If unsure about the weight of the bin, weigh it using the floor scale or a weighing pallet jack. One empty euro bin is roughly 40kg, do not underestimate the potential total weight of the bin when it is full.
Emergency Response
In the event of an emergency, please follow the instructions below to ensure the safety of yourself and others.
Evacuation Procedures
In case of fire, chemical spill, or other emergency, follow the Emergency Evacuation Map posted at key locations throughout the site.
Always take note of your nearest emergency exit and the group assembly point. For the Manufacturing team, go to Assembly Point 3.
During an evacuation, the instructions of fire wardens have the highest authority.
Your own safety is more important than any asset or work instructions.
In an emergency, do not go back to take your belonging but follow the fire wardens’ instructions first. And do not re-enter the building until cleared by emergency personnel or a designated fire warden.
Once you are at the Assembly Point, report to your leader.

Emergency Equipment
The locations of emergency equipment are shown on the emergency diagram.
No objects are allowed within a one-meter radius of any emergency equipment.
Obstructing emergency equipment is a legal offence.

First Aid
The site is equipped with first aid kits and equipment that are serviced routinely at the following locations:
Manufacturing office
SFL office
Warehouse office
Maintenance workshop mezzanine
First Aid room
2 Eye Wash Stations (Warehouse Chemical Cage/Shopfloor Corridor Chemical Cage)
Each kit is clearly marked and includes a list of current trained First aiders
If you use the last piece of any first aid kit, report it to the Manufacturing Office or one of the First Aiders
Seek assistance from a First Aider
Seek for a First Aider for yourself or others in the following situations:
Any injury requiring treatment beyond basic self-care
Loss of consciousness, bleeding, or signs of serious illness
Uncertainty about how to treat an injury safely.
Helping Others
If someone is injured or in danger, you may assist only if it is safe to do so.
Do not put yourself at risk. Call for help immediately if the situation is beyond your ability to manage safely.
General Safety - Around the Factory
Traffic
The maximum speed limit for vehicles in the Hakka premises is 10 km/h. Follow the speed limits.
Parking in “Designated Areas” only.
Do not walk between a moving vehicle and a fixed object, such as a wall, dock, or rack.
Pedestrians should always stay clear of the driveway and watch out for any moving vehicles including forklifts.

Heavy Vehicles/Trucks
Large trucks and heavy vehicles frequently enter and exit the factory area. Always stay alert when walking or working near the loading zones or driveways.
Only trained personnel may direct or guide trucks and traffic.
Be aware of truck blind spots—drivers may not see you even if you see the truck. Never stand or walk behind, beside, or close to the front of large vehicles.
Forklift/ Pallet Jacks
The maximum speed limit for Forklift and Pallet Jack inside manufacture is 5 km/h.
Forklifts and pallet jacks must sound the horn at every corner, intersection, or door, regardless of pedestrian presence.
Only authorized personnel may operate forklifts. The key must be removed when the forklift is unattended.
Lower the tines to the ground when parked, and do not obstruct any safety equipment or emergency exit.
Only transfer loads that are checked and confirmed to be stable and properly stacked.
Standing on a forklift is only permitted with a safety cage installed.
Never stand or ride on the tines of a still or moving forklift or pallet jack.
When operating a forklift or pallet jack, always look at where you are going. Do not walk backwards.
General Safety – Working in the Factory

Personal protective equipment (PPE)
Employees must wear the designated personal protective equipment (PPE) correctly, according to the GMP guidelines and your job requirements.
Inspect PPE to ensure it is in good condition. If at any time you notice that your PPE is damaged or torn, replace it immediately.
Check for any loose or dangling materials on you before entering the GMP area. eg. no loose scarf, wide sleeves or pants, all hair is collected into your hairnet. Make sure nothing might get entangled into a machine.
If you must wear a hijab, tuck it fully into your overcoat and hairnet. This is a work safety requirement.
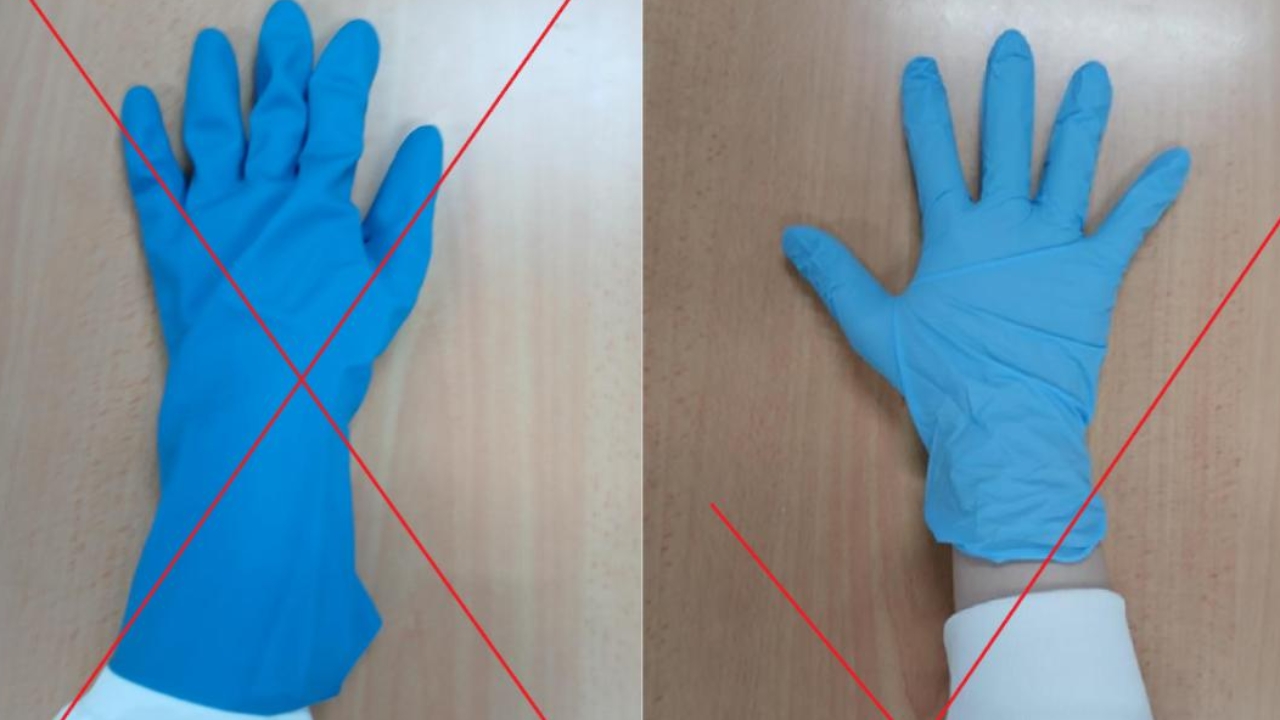
Ensure your overcoat is the right size for you, and gloves fit your hands. Do not wear oversized overcoats or gloves as it may become a safety risk when you work.

Personal protective equipment (PPE)
Wear earplugs or ear muffler to protect your ears from the noise. The factory is always noisy with all sorts of machines running, and being exposed to high levels of noise for prolonged period of time could cause fatigue and damage your hearing.

Walking Around in the Factory
Running in the factory is strictly prohibited.
Never attempt to pass or squeeze through the space next to a forklift or pallet jack in operation. Wait at a safe distance until the forklift/ pallet jack has passed completely then proceed.
When a forklift is performing overhead work, avoid walking nearby and never stand underneath the forklift or its load. Take an alternate route whenever possible.
Always pay attention to objects and potential hazards above, below, and around you to prevent collisions and other accidents. Please also refer to the detailed table for more information. (English/Chinese)
Always pay attention to objects and potential hazards above, below, and around you to prevent collisions and other accidents. Please also refer to the detailed table for more information. (English/Hindi)
Always pay attention to objects and potential hazards above, below, and around you to prevent collisions and other accidents. Please also refer to the detailed table for more information. (English/Tamil)
Always pay attention to objects and potential hazards above, below, and around you to prevent collisions and other accidents. Please also refer to the detailed table for more information. (English/Malayalam)

Manual Handling
Assess the weight and size of the item before lifting. Make sure it is safe to handle. The acceptable weight generally not exceeding 20–25 kg for one person, easy to grasp with both hands, and designed or packaged in a way that allows for a secure and stable grip.
If the item is too heavy or bulky, ask for help or use proper equipment (e.g. trolley).
Keep your back straight, bend your knees, and lift with your legs — not your back.
Hold the load close to your body to reduce strain.
Avoid twisting your body. Turn your whole body with your feet instead.
Stop immediately and report to your supervisor if you feel pain or discomfort.

Stack/Store Goods
Materials must be stacked neatly and securely to prevent tipping, collapsing, or falling. Avoid stacking irregularly shaped or unstable items.
Do not exceed the maximum stacking height or weight limit as defined by site policy. For Shopfloor team refers to SOP: SFC302.01 for detailed training.
Heavier and larger items must be placed at the bottom, and lighter items on top.
If needed, use transparent wrap or strips to secure loads.
Do not stack items near edges of mezzanines without fall protection barriers.
Do not climb or stand on stacked materials or pallets.
Using Tools
Before using a tool, especially long-handled tools, check first for sufficient clearance around yourself to avoid hitting people or objects.
Avoid sudden or big movements that may accidentally strike nearby coworkers.
After use, return the tools to their proper storage location. Do not leave tools on the floor, stairs, machines, or walkways where they can become tripping hazards or cause food safety issues.
Check that tools are in good working condition (no cracks, loose parts, or excessive wear) before use.
Do not use tools for tasks they weren’t designed for (e.g., using a wrench as a hammer).
Never leave tools on or inside machines, regardless of whether the machine is running or not. There is a significant risk of tools falling or being drawn into moving parts, and causing serious injury or damage.

Using Knives
Use knives, cutters, and other sharp tools only for their intended purpose.
Always cut away from your body and others when using a knife.
Use cut-resistant gloves if required by the task.
When not in use, all knives and sharp tools must be stored inside the designated toolbox or storage container.
Do not leave blades on trollies, machines, or other open surfaces.
Always be mindful of your hand placement when cutting. Use a proper cutting technique, such as the “claw grip”, to keep fingers curled inward and away from the blade

Using Knives
Do not leave blades on trollies, machines, or other open surfaces.
Always be mindful of your hand placement when cutting. Use a proper cutting technique, such as the “claw grip”, to keep fingers curled inward and away from the blade
Electrical Safety
Treat all electrical equipment, cords, and outlets as potential hazards. Report any damaged wires, power plugs or power sockets to the team leaders or office immediately.
Ensure a power plug is fully inserted into the socket and turn it to lock position; never force a plug that doesn't fit.
Keep power cables off the floor and out of walkways to prevent tripping or damage.
If you notice a burning smell, sparks, flickering, or any abnormal sign from electrical devices:
1.Stop using it immediately.
2.Unplug it only if safe to do so.
3.Report the issue to your supervisor or maintenance team.
Electrical Safety
The correct order of plugging a power plug and turn on a machine:
1.Make sure the power switch and the machine are both turned to OFF.
2.Plug in securely and turn the power plug to lock position.
3.Turn the power switch to ON.
4.Now you can turn on the machine when ready.
The correct order of unplugging:
1.Turn off the equipment.
2.Turn the power switch to OFF.
3.Unplug.

Chemical Safety
Only trained personnel should access the chemicals as requested by the leaders.
All chemicals must be returned to the designated chemical storage cage (one behind packaging team, one in the Warehouse) immediately after use. The chemical storage cage should always be locked.
Do not leave chemicals unattended.
Ensure the containers are not broken and are tightly sealed before storage to prevent leaks, spills, or evaporation.
Always check that chemical containers are clearly labelled with the correct name. Safety Data Sheets (SDS) for all chemicals in use are posted on the chemical storage cage.
Do not use chemicals from unlabelled or unclear containers. Report them to your supervisor immediately.
When handling chemicals, you must wear the appropriate PPE as required for the specific substance and task. This includes, but is not limited to:
·Chemical-resistant gloves
·Face shield or safety goggles
·Apron or poncho
Do not mix chemicals unless specifically instructed and trained to do so.
Always carry chemical containers with both hands and use secondary containment (e.g., trays or carriers) when transporting.

Freezers
Do not enter the freezers if you are not trained and instructed to enter.
If you are trained and instructed to enter, you should be provided with the appropriate PPE including warm jacket and slip-resistant boots and the ice claws for icy surfaces.
Behind each freezer door, there is an rescue bell.
Although the freezer doors do not have locks, they may sometimes become stuck due to ice buildup. If you find yourself unable to open the freezer door, immediately rotate the rescue bell located inside the freezer.
If you need to enter the freezer for less than 5 minutes, it is not necessary to close the door.
If you plan to work inside the freezer for an extended period, inform your supervisor of your location and expected working time.
Freezer 3 and Freezer 4 are equipped with emergency exits. These emergency exits must always remain clear and unobstructed.

Other Potential Risks
The factory is a busy area. Always be alert of your surroundings when walking inside the factory to avoid accidents.

Other Potential Risks
Mezzanine stairs are often steeper and narrower than standard stairs
Always hold the handrail when using platform stairs and move slowly.
The factory has pressured water system for machine cleaning. Beware when you turn on any water gun. Start by pressing lightly, before increasing the water flow.