

• It is always good practice to disconnect the battery while working on 12 Volt systems.
- Please check the owner’s manual for vehicle-specific requirements as some models may need battery backup.
• Auto electrical work should be carried out by a competent person. Vehicle wire colours are listed as a guide only and may vary on some makes and models. • The function of each wire should be checked before any connections are made.
• All wires tapped into should be soldered and then insulated with electrical tape or heat shrink. • Grounding/Earth points must always be connected to the factory grounding points, not to the battery negative terminal. See owner’s manual.
• Using only a LED test light, test all electrical components of the vehicle before and after wiring. This is to ensure everything works correctly.
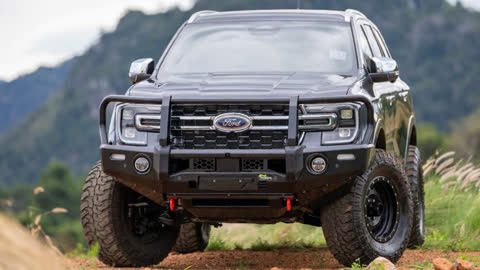
• Ironman 4x4 does not recommend the installation of large or light-coloured antennas or aerials to the front of a bull bar as this may cause the lane departure system to malfunction.

• Only a competent person should perform accessory installations. It is the responsibility of this person to ensure correct fitment. • Whilst working on this vehicle, always use appropriate safety equipment.
• Read and understand instructions fully before commencing fitment. • Check the hardware supplied against the contents list on the following pages. • Do not use this product for any vehicle make or model other than specified in these instructions.
• This product and or hardware must not be modified in any way. Do not remove labels from this product. • Recording the batch number on the customer’s job card is good practice for future reference, or complete the information below and file with customer job card.
Care Instructions: • To maintain the finish of the product, wash regularly using a PH neutral car wash, hose off and chamois dry. • Do not use acidic or alkaline cleaners. • Plastic components can be maintained with a silicone spray or similar (non-acidic or alkaline based).

• Ironman 4x4 recovery points are FEA tested during design and destruction tested during development to establish the Working Load Limits (WLL). • Ironman 4x4 recovery points have been designed as a matching pair, supplied as right and left sides for vehicle-specific fitment.
• Ironman 4x4 includes specific mounting hardware to ensure correct fitment to your 4WD. The correct fitment of these components is critical for your safety.
• Do not use this recovery point for any other vehicle make or model other than the one intended and specified by Ironman 4x4. • Do not alter or modify the recovery point in any way. Doing so may compromise the strength and integrity of the recovery point.
• Ensure all bolts are tightened to the specified torque. • Do not remove warning labels from recovery points. (Some recovery points require the warning labels to be installed, these are supplied and must be installed).
• It is advised to use an equalising or bridle strap. Failure to do so correctly can result in recovery point fatigue or bending and void your warranty. • Never use a single recovery point combined with a side load pull.
Recovery Points are designed for a straight-line pull, by pulling on an angle or sideways pull may result in a reduction of the WLL.

• This product has been tested for airbag compatibility; therefore, the mounting system MUST NOT be modified. • This bull bar should not impede the operation of the Intercooler Active Aero.
• Fitting instructions are correct at the time of publication date and Ironman 4x4 cannot be held responsible for any vehicle changes from the manufacturer. It is the responsibility of the installer to ensure correct fitment.
Accessories
Mandatory: To meet some State Regulations, the bull bar plug-and-play wiring harness (parker/indicator/fog lights) is required to be fitted - IBBPL110.
This must be ordered separately.
Optional: If installing driving lights or lightbar, you will require a suitable wiring harness to access the IPL connector (High Beam Trigger). These are sold separately. • Lightbar patch loom - ILBWL001 • Scope 7” driving lights - IDLWL001 • Scope 9” driving lights - IDLWL002
Optional: If fitting a winch, a winch extension cable is not required given the proximity of the winch to the plug fitting hole in the bull bar unless positioning in an alternative location. • Winch extension cable - WWB030 • Hidden control box mount kit - WWBCP110

Tools Required:
- Metric Spanner Set
- Screwdriver Set
- Metric Socket Set
- Air Hacksaw
- Tape Measure
- Drill and Dill Bits
- Workshop Stands

Torque Guide Specifications

Before installation, unwrap the hardware. Unwrap the bull bar, taking care not to damage or scratch in the process. Inspect bar for any damage. Ensure bull bar application is compatible with the vehicle and you have the correct cutting template.

Remove and retain the number plate if fitted, to be reinstalled later. Remove the factory number plate holder.
Disconnect the negative battery terminal if applicable.
Note: Check manufacturer’s handbook for any recommendations.
Remove and retain the top plenum cover, ensuring to keep all plastic clips.

Once the cover is removed, disconnect front camera wiring, washer nozzle hose (if applicable) and grey bumper harness.

Tip: It’s advised to apply masking tape across the front of the bumper and under the headlights, to protect painted surfaces from possible damage.

Remove two (2) upper grille bolts and starting on the outside headlight section.
Once unclipped, depress the lower grill clips and gently remove the grill.
Store front grille in a safe place for later reinstall.

Remove all factory flare clips from around the vehicle wheel arch. Retain clips for later use. Remove the lower retaining bolt. Repeat procedure on opposite side.

Unclip the flare starting at the front lower section and making your way back along the guard.
Note: If the vehicle has blind spot sensors, this will need to be disconnected before commencing to unclip the flare.
Repeat procedure on opposite side.

Remove the three (3) clips and two (2) bolts from the factory bumper to the radiator support.

Under the inner guard there are inspection ports. Remove the three (3) clips and twist the guard out of the way to access the bolts and clips behind securing the factory bumper to the guard.
Repeat procedure on opposite side.

Under the inner guard, remove the three (3) bolts and place aside for later use.
Repeat procedure on opposite side.

Remove the bolts from the factory bumper on the underside. There are two (2) located on each side. Repeat procedure on opposite side.

To remove the factory bumper, depress the inner clip and...

Firmly, but gently pull downwards. Repeat procedure on opposite side. Tip: We suggest using a 10mm socket to ‘pop’ the clip out.

Remove the factory bumper and bar foam. Unbolt the three (3) bolts on each side securing the bar reinforcement and place aside for later use.

If vehicle is fitted with a radar, unclip the cover, disconnect the plug and remove the two (2) side bolts. There is another bolt located behind, remove this too. Carefully remove the radar, ensuring you do not drop it.

Unplug horn and remove horn bracket. Retain for later use.

Remove and discard the left-hand and righthand lower bar brackets.

Support intercooler with workshop stands and remove outer tie down points / intercooler support brackets. Retain the bolts for later use.

The next step requires the following supplied parts: Item 14:
- Support Mounting Bracket - LHS Iem 15:
- Support Mounting Bracket - RHS

Mount new lower intercooler brackets supplied to both sides of the vehicle using original factory hardware. Finger tighten only.

The next step requires the following supplied parts: Item 22:
- Wired crush tube Item 31:
- Hex Head Bolt M12 (110 x 1.75mm) (H19)
- Flat Washer M12 (36.5 x 14 x 4.0mm)
- Spring Washer M12
- Hex Nut M12 (H19)

Feed the crush tube and M12 bolt through the chassis bracket and chassis. Repeat procedure on opposite side.

The next step requires the following supplied parts: Item 7:
- Rear chassis bracket spacer - LHS Item 9:
- Front chassis bracket spacer - LHS Item 10:
- Front chassis bracket spacer - RHS Item 37: Hex Head Bolt M8 Spring Washer M8 Flat Washer M8

On the Left Hand Side of the vehicle: Drill the two (2) existing holes out to 10mm. Deburr and paint. Use the remaining cradle hardware through these drilled holes and finger tighten only.

The next step requires the following supplied parts: Item 8:
- Rear chassis bracket spacer - RHS Item 9:
- Front chassis bracket spacer - LHS Item 10:
- Front chassis bracket spacer - RHS Item 37:
- Hex Head Bolt M8
- Spring Washer M8
- Flat Washer M8

On the Right Hand Side of the vehicle: Drill the two (2) existing holes out to 10mm. Deburr and paint. Use the remaining cradle hardware through these drilled holes and finger tighten only.

The next step requires the following supplied parts: Item 12:
- Recovery point - LHS Item 33:
- Hex Head Bolt M12
- Spring Washer M12
- Flat Washer M12 Item 35:
- Hex Head Bolt M10
- Spring Washer M10
- Flat Washer M10
Starting on left-hand side, place recovery point in position and secure to cradle at the front using supplied hardware and original factory bolts to the rear (do not use supplied bolts).

The next step requires the following supplied parts: Item 13:
- Recovery point - RHS Item 33:
- Hex Head Bolt M12
- Spring Washer M12
- Flat Washer M12 Item 35:
- Hex Head Bolt M10
- Spring Washer M10
- Flat Washer M10
On the right-hand side, place recovery point in position and secure to cradle at the front using supplied hardware and original factory bolts to the rear (do not use supplied bolts).

Find a fixed point on the vehicle and opposing side of cradle as shown. Take measurement to square up and centre cradle. Repeat from left and right fixed points until the cradle is centred.
Tip: Use the inside edge of the headlight as a guide.
Tighten OEM bolts, check measurements and readjust if neccessary.
Once centred, tighten chassis through bolt to pull unit together. Tighten forward facing bolts to torque guide specifications.
Proceed to tighten all other bolts to torque guide specifications. Paint mark all bolt heads.

Unbolt the factory bracket from the horn and discard.

The next step requires the following supplied parts: Item 20:
- Horn Mounting Bracket Item 42:
- Hex Head Bolt M6 (20 x 1.0mm) (H10)
- Spring Washer M6
- Flat Washer M6 (22.5 x 6.5 x 2.5mm)

Using supplied new bracket and hardware, attach horn and bracket together, securing in place on cradle as shown using original factory bolts.
Reconnect horn plug.

Winch Option: If installing a winch, you can use the optional winch control box bracket and control box extension wiring loom. P/N: WWBCP110 / P/N: WWB031
Tip: Mount the control box bracket to the right-hand side of the lower radiator support / inner guard.

Install winch control box mounting bracket to winch control box. We recommend drilling a 6mm drain hole in the lower control box housing to prevent moisture build up. Take care not to damage the internal components.

Note: Ford Ranger vehicles are equipped with a BMS (Battery monitoring system), and nothing should be connected to this battery module. There is a spare post on the factory bus bar.
Please check owner’s manual if unsure. Earthing/grounding points must always be connected to the factory grounding points and not to the battery negative terminal.

Install the winch to the cradle.

Position the cutting template in place under headlight and align with guard edge and grille line. Use the bodyline on the bumper as reference to mark the cut line on assembly as shown.
Note: We advise using masking tape over the surface of the bar to protect the paint work. Please download the latest version of the cutting template from the following Ironman 4x4 link, as bar cuts can vary between models.
https://www.ironman4x4.com/fitting-instructions/

Flip the cutting template and repeat the procedure on opposite side.

Cut along the lines marked in the previous step, along the lower vent edge then straight across, under the grille opening. Remove lower section of bumper from vehicle.

The next step requires the following supplied parts: Item 25:
- Pinch weld

- Deburr cut section and apply pinch weld along the cut lines on each side of the vehicle. Refit bolts and clips removed previously to secure in place. Repeat procedure on opposite side.
Note: If the vehicle doesn’t have factory-fitted parking sensors, the Parking Sensor Holders will still need to be installed into the new bull bar to fill sensor provision holes.
IMPORTANT: For parking sensors to function correctly, these instructions must be followed closely. Before removing sensors from the original bumper bar, note the location and orientation of each sensor. This is so when they are fitted back into the bull bar their original locat
IMPORTANT: Do Not Paint Parking Sensors Parking sensors are a delicate piece of the vehicle’s safety system. The centre “eye” of the sensor is responsible for detecting objects within a specified distance of the vehicle.
Painting a Parking Sensor does not damage it, but inhibits the sensor’s ability to detect objects in its surroundings, causing a malfunction or premature detection. Parking Sensors should only be painted once by the OEM, as the more you paint them, the less effective they become.
Ironman 4x4 highly recommends not colour-coding parking sensors when installing a bull bar as excessive paint thickness will adversely affect the operation of the park assist system.

Remove the parking sensor wiring and parking sensors from the factory bumper taking note of the position order and orientation of each sensor.

The next step requires the following supplied parts: Item 21:
- Sensor holders

The centre of the plastic sensor holder will need to be removed to install parking sensors. If the vehicle doesn’t have factory parking sensors, leave the centre complete.

Fit the sensor with the factory silicone sleeve to the sensor holder. Use the flat side of the clamping plate to secure the sensor. The sensor will false alarm if excess pressure is applied to the sensor body.

Clean inside the bull bar, around sensor holes, and the mounting surface of parking sensor holders using grease and wax remover. Note: It is advised to lightly scuff the inside of the bull bar and the sensor mounting face holder with a dry scouring sponge.

The next step requires the following supplied parts: Item 44:
- 3M Primer

Apply adhesion promoter to the mounting surfaces around the sensor holes and on the sensor holders. This step is important to ensure sensor holders adhere properly to the bull bar.

Remove the protective film from one side of the double-sided tape and apply to the mounting surface of the sensor holder.

Run the factory harness cabling in between brackets. Clip in parking sensors into parking sensor housings.
Note: Don’t cable tie off yet, leave wiring loom loose.

If applicable, carefully remove the camera from behind the grille, making sure not to drop it. Remove wiring and water hose.

The next step requires the following supplied parts: Item 23:
- Camera bracket

Fit the camera to bull bar through the camera hole located above the radar mesh. Using the bolts from the camera blanking plate and camera bracket supplied, secure in place.

Tip: We suggest carefully unpicking the camera protective harness from the main wiring loom to provide extra length. Take extra care not to damage the wiring loom in the process and retape once completed. This will allow for easy reconnection when fitting the bar.

Once camera is secure in place on the bull bar, reconnect the camera extension plug.
Note: Some makes of Everest have the camera cable located on the left-hand side of the vehicle, requiring an IBBCLE115 replacement cable.

If the vehicle has a factory radar:
Remove the centre mesh from the bull bar and loosen side plate bolts to allow the factory radar to fit between.

Measure distance between the upper and lower radar infill.

Mark the cover and cut.

Secure radar in place using the previously removed hardware.
Note: Front face of the radar should be perpendicular to the ground. If not, adjust the 8mm bolt on the front of the radar to fine-tune.

Clip radar cover onto the bracket and push the clips back.
Note: Leave the cover loose to assist with reconnection of the radar plug once bull bar is installed.

The next step requires the following supplied parts: Item 2:
- Number plate flip bracket Item 24:
- Wired spring clip Item 27:
- Zip ties Item 28:
- Dome Hex Head Bolt M10
- Flat Washer M10
- Nyloc Nut M10
Item 29:
- Dome Hex Head Bolt M8
- Flat Washer M8
- Nyloc Nut M8 Item 41:
- Hex Head Bolt M6
- Flat Washer M6
- Spring Washer M6
- Hex Nut M6 Item 42: -Hex Head Bolt M6
- Spring Washer M6
- Flat Washer M6 Item 43:
- Cage Nut M6

Complete dressing the bar with number plate flip bracket, fairlead and front wire grille panel using hardware supplied. Check all bolts, fittings and overriders are tightly secured. Fix all wiring in place with cable ties.
Connect parkers, indicators and fog lights (if applicable). If fitting driving lights we recommend installing at this stage for ease of access.
Note: If connecting a wiring harness, we strongly recommend using the Ironman 4x4 IBBPL110 or IPLS110 due to the complexity of new vehicle wiring. These should be installed at this point. Please see product specific instructions for correct fitting procedures.
Refit the grille into place, securing loosely before preparing to fit bull bar.

The next step requires the following supplied parts: Item 1:
- Bull bar assembly Item 34:
- Hex Head Bolt M12 (40 x 1.25mm) (H19)
- Flat Washer M12 (36.5 x 14 x 4.0mm) x 2
- Spring Washer M12
- Hex Nut M12 (H19)

Lift the bull bar into position and align with the chassis mounting holes. Secure in place using M12 x 40mm bolts on both sides. Centralise the bull bar to the vehicle body and nip up lower bolt on each side to allow for manipulating into correct position.
Note: Allow approximately 25mm gap between the bull bar and bar wing. This is to allow for chassis flex and prevent body panels and bull bar coming into contact.
Warning: Unless using a bull bar assist lift, we recommend two (2) persons complete this task to avoid personal injury or damage to the vehicle and/or components

Tip: We suggest feeding the bull bar harness back up behind the left-hand side headlight, through the grille support up to the plenum.
Tighten all bolts using torque guide specifications.
Paint mark all bolt heads.

The next step requires the following supplied parts: Item 30:
- Flange Hex Head Bolt M10 (30 x 1.25mm) (H17)
- Flat Washer M10 (29.5 x 10.5 x 3.0mm)
- Spring Washer M10
- Hex Nut M10 (H17)

Drill pinning holes and pin the bar in place using M10 x 30mm pinning bolt sets.

Repeat procedure on opposite side.

The next step requires the following supplied parts: Item 27:
- Zip ties

Connect lights (if applicable). If winch has been fitted, run the extension harness through the wiring hole, located on the right-hand side and secure in place with hardware supplied.

Wiring Diagram: Daytime Running Lights, Parking Lights, Indicator Lights.

Wiring Diagram: Fog Lights

Wiring Diagram: Without Factory Fog Lights

The next step requires the following supplied parts: Item 3:
- Underbody protection plate Item 11:
- Air trap plate Item 36:
- Hex Head Bolt M10 (30 x 1.5mm) (H17)
- Spring Washer M10
- Flat Washer M10 (50 x 12 x 3.0mm)
Item 40:
- Hex Head Bolt M8 (20 x 1.25mm) (H13)
- Spring Washer M8
- Flat Washer M8 (22.5 x 8.5 x 2.5mm) Item 42:
- Hex Head Bolt M6 (20 x 1.0mm) (H10)
- Spring Washer M6
- Flat Washer M6 (22.5 x 6.5 x 2.5mm)

- Install the centre protection plate with hardware supplied and refit the centre factory stone tray. It’s advised to install the air duct prior to protection plate installation.
The centre protection plate is made from heavy 4mm thick steel, we recommend two (2) persons complete this task to avoid personal injury or damage to the vehicle and or components.

The next step requires the following supplied parts: Item 16:
- Side wing protection plate bracket 1 - LHS Item 18:
- Side wing protection plate bracket 2 - LHS
Item 39:
- Hex Head Bolt M8 (30 x 1.25mm) (H13)
- Flat Washer M8 (26 x 8.5 x 2.5mm)
- Flat Washer M8 (22.5 x 8.5 x 2.5mm)
- Spring Washer M8
- Hex Nut M8 (H13) Item 40:
- Hex Head Bolt M8 (20 x 1.25mm) (H13)
- Spring Washer M8
- Flat Washer M8 (22.5 x 8.5 x 2.5mm)

On the left hand side of the vehicle, install wing protection plate bracket withhardware supplied, securing to the outer cradle.

The next step requires the following supplied parts: Item 17:
- Side wing protection plate bracket 1 - RHS Item 19:
- Side wing protection plate bracket 2 - RHS
Item 39:
- Hex Head Bolt M8 (30 x 1.25mm) (H13)
- Flat Washer M8 (26 x 8.5 x 2.5mm)
- Flat Washer M8 (22.5 x 8.5 x 2.5mm)
- Spring Washer M8
- Hex Nut M8 (H13) Item 40:
- Hex Head Bolt M8 (20 x 1.25mm) (H13)
- Spring Washer M8
- Flat Washer M8 (22.5 x 8.5 x 2.5mm)

On the right hand side of the vehicle, install wing protection plate bracket withhardware supplied, securing to the outer cradle.

Hold the wing protection plate in position and mark the guard liner to be trimmed. Trim guard liners.
Repeat procedure on opposite side

The next step requires the following supplied parts: Item 4:
- Side wing protection plate - LHS Item 40:
- Hex Head Bolt M8 (20 x 1.25mm) (H13)
- Spring Washer M8
- Flat Washer M8 (22.5 x 8.5 x 2.5mm)

On the left hand side of the vehicle, install outer wing plate with hardware supplied, securing to lower bull bar and wing protection plate bracket.

The next step requires the following supplied parts: Item 5:
- Side wing protection plate - RHS Item 40:
- Hex Head Bolt M8 (20 x 1.25mm) (H13)
- Spring Washer M8
- Flat Washer M8 (22.5 x 8.5 x 2.5mm)

On the right hand side of the vehicle, install outer wing plate with hardware supplied, securing to lower bull bar and wing protection plate bracket.

The next step requires the following supplied parts: Item 26:
- Recovery point warning sticker

Apply recovery point sticker to LHS and RHS recovery points.

Install number plate and number plate to the vehicle with hardware supplied.
Tip: For aesthetics, we recommend using a slimline plate.

Reconnect front camera wiring extension, washer and bullbar wiring loom. Reinstall grille, plenum and connect negative battery terminal if applicable.
Forward camera calibration: Note: Not all vehicles will require recalibration, it’s up to the installer to verify. DAYTIME PROCEDURE ONLY - drive the vehicle on a straight road with clear line markings at between 10-40km per hour for around 10 minutes.
If possible, avoid turning as this will increase the time taken to calibrate. Once driven for about 10 mins, stop the vehicle and check the 360° camera view on the dash has completed calibration (the vehicle should be in the center of view with dashed lines on either side).
Now Place the vehicle in reverse and confirm there is no RBA Not Available warning display. If the calibration is not completed or RBA not available/ warning is still shown, repeat the driving procedure.
Once Installed: • Ensure all bolts are tensioned correctly • Doing a pre-trip check before heading away, or every 10,000km (6,200 miles) is good practice. • Visually inspect bull bar and hardware, retention bull bar hardware or when needed.
• Check the operation of the indicators, park lights, fog lights and winch if installed and ensure that they are all functioning correctly. • Ensure all electrical wiring is clear of sharp edges and correctly secured.
• If vehicles are fitted with parking sensors, radars and/or front cameras, check they are operating correctly. • Some makes and models may need to return to the dealership for recalibration.

Now, Stand back, grab a beer, admire your work, and reflect on how AWESOME these instructions are!
